1. Poisson 方程 I Poisson Equation I#
Overview
This chapter is a step-by-step introduction to solving the Poisson equation with Firedrake: built-in meshes, the Unified Form Language (UFL), function spaces, solver options, quadrature rules, Dirichlet and Neumann boundary conditions, and computing convergence rates. It is the recommended starting point for beginners.
Note
本章部分单元依赖仓库中 firedrake/py/ 和 firedrake/gmsh/ 目录下的辅助文件.
请克隆整个仓库,
并在 firedrake/ 目录下运行本笔记本.
Note
Some cells in this chapter rely on helper files in the firedrake/py/ and
firedrake/gmsh/ directories of the repository. Please clone the
whole repository and run this
notebook inside the firedrake/ directory.
这里以 Poisson 方程为例, 介绍 Firedrake 的使用, 包括定义有限元空间和变分形式, 施加边界条件, 以及选择不同的数值方法求解线性方程组.
考虑 Poisson 方程
Taking the Poisson equation as an example, we introduce the basic usage of Firedrake: defining finite element spaces and variational forms, applying boundary conditions, and solving the resulting linear systems with different numerical methods.
Consider the Poisson equation
其中where \(\partial\Omega_D\cap\partial\Omega_N = \partial\Omega\) 且and \(\int_{\partial\Omega_D} {\rm d}s \ne 0\).
定义 试探 (trial) 和 检验 (test) 函数空间
Define the trial and test function spaces
Poisson 方程的 变分形式 为
求解 \(u \in H_E^1\), 使得
The variational form of the Poisson equation reads:
find \(u \in H_E^1\) such that
成立.
1.1. 简单完整示例 A complete minimal example#
这里我们求解在区域 \(\Omega = (0, 1)\times(0, 1)\) 上的 Poisson 问题, 边界条件为齐次迪利克雷边界条件, 即 \(\partial\Omega_N = \emptyset, \partial\Omega_D = \partial\Omega\) 且 \(g_D = 0\).
另外, 我们假设右端源项 \(f = \sin(\pi x)\sin(\pi y)\).
We solve the Poisson problem on \(\Omega = (0, 1)\times(0, 1)\) with the homogeneous Dirichlet boundary condition, i.e. \(\partial\Omega_N = \emptyset, \partial\Omega_D = \partial\Omega\) and \(g_D = 0\).
The source term is taken to be \(f = \sin(\pi x)\sin(\pi y)\).
from firedrake import *                             # Import firedrake
import matplotlib.pyplot as plt

N = 8
test_mesh = RectangleMesh(nx=N, ny=N, Lx=1, Ly=1)   # Build mesh on the domain
x, y = SpatialCoordinate(test_mesh)
f = sin(pi*x)*sin(pi*y)
g = Constant(0)

V = FunctionSpace(test_mesh, 'CG', degree=1)        # define FE space

u, v = TrialFunction(V), TestFunction(V)            # define trial and test function
a = inner(grad(u), grad(v))*dx
L = inner(f, v)*dx                                  # or f*v*dx

bc = DirichletBC(V, g=g, sub_domain='on_boundary')

u_h = Function(V, name='u_h')
solve(a == L, u_h, bcs=bc)          # We will introduce other ways to code in the following.

# Plot the result
fig, ax = plt.subplots(figsize=[4, 4], subplot_kw=dict(projection='3d'))
ts = trisurf(u_h, axes=ax)

# You may want to save the figure
# fig.savefig('figures/example.pdf', bbox_inches='tight')
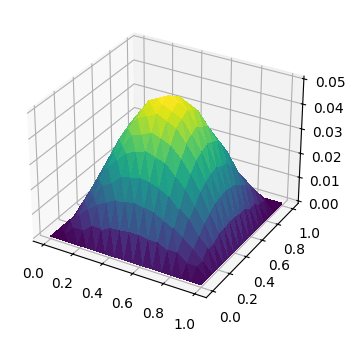
逐行解释如下:
RectangleMesh(nx=N, ny=N, Lx=1, Ly=1): 在 \((0,1)\times(0,1)\) 上构造 \(N\times N\) 的三角形网格;SpatialCoordinate: 返回坐标符号 \(x, y\), 用于书写源项 \(f\) 等表达式;FunctionSpace(test_mesh, 'CG', degree=1): 网格上的连续分片线性 (P1) 有限元空间 \(V_h\);TrialFunction/TestFunction: 试探函数 \(u\) 和检验函数 \(v\), 它们只是符号, 不存储数值;a = inner(grad(u), grad(v))*dx与L = inner(f, v)*dx: 双线性形式 \(\int_\Omega \nabla u\cdot\nabla v\) 和右端项 \(\int_\Omega fv\),dx表示对区域内部积分;DirichletBC(V, g=g, sub_domain='on_boundary'): 在整个边界上施加 \(u = 0\);u_h = Function(V): 存放数值解的有限元函数 (这才是有数值的对象);solve(a == L, u_h, bcs=bc): 组装并求解线性方程组, 结果写入u_h.
Line by line:
RectangleMesh(nx=N, ny=N, Lx=1, Ly=1): build an \(N\times N\) triangular mesh of \((0,1)\times(0,1)\);SpatialCoordinate: the coordinate symbols \(x, y\), used to write expressions such as the source \(f\);FunctionSpace(test_mesh, 'CG', degree=1): the continuous piecewise-linear (P1) finite element space \(V_h\) on the mesh;TrialFunction/TestFunction: the trial function \(u\) and test function \(v\); they are purely symbolic and hold no values;a = inner(grad(u), grad(v))*dxandL = inner(f, v)*dx: the bilinear form \(\int_\Omega \nabla u\cdot\nabla v\) and the right-hand side \(\int_\Omega fv\);dxmeans integration over the domain;DirichletBC(V, g=g, sub_domain='on_boundary'): impose \(u = 0\) on the whole boundary;u_h = Function(V): the finite element function holding the numerical solution (this object does store values);solve(a == L, u_h, bcs=bc): assemble and solve the linear system, writing the result intou_h.
该问题的真解为 \(u = \sin(\pi x)\sin(\pi y)/(2\pi^2)\), 可以直接计算数值解的 \(L^2\) 误差验证程序:The exact solution of this problem is \(u = \sin(\pi x)\sin(\pi y)/(2\pi^2)\), so we can verify the code by computing the \(L^2\) error directly:
u_exact = sin(pi*x)*sin(pi*y)/(2*pi**2)
print('L2 error:', errornorm(u_exact, u_h))
L2 error: 0.0010705988102178974
tsfc:WARNING Estimated quadrature degree 12 more than tenfold greater than any argument/coefficient degree (max 1)
1.2. Firedrake 中的内置网格 Built-in meshes in Firedrake#
Firedrake 提供了许多常见几何区域的网格构造函数, 包括矩形, 圆形, 长方体, 球形等.
Firedrake provides mesh constructors for many common geometries, including rectangles, disks, boxes and spheres.
from firedrake import utility_meshes

print('List of builtin meshes:')
for i, name in enumerate(utility_meshes.__all__):
    print(f'  {name:<25s}', end='')
    if (i+1)%3 == 0:
        print('')
List of builtin meshes:
  IntervalMesh               UnitIntervalMesh           PeriodicIntervalMesh
  PeriodicUnitIntervalMesh   UnitTriangleMesh           RectangleMesh
  TensorRectangleMesh        SquareMesh                 UnitSquareMesh
  PeriodicRectangleMesh      PeriodicSquareMesh         PeriodicUnitSquareMesh
  CircleManifoldMesh         UnitDiskMesh               UnitBallMesh
  UnitTetrahedronMesh        TensorBoxMesh              BoxMesh
  CubeMesh                   UnitCubeMesh               PeriodicBoxMesh
  PeriodicUnitCubeMesh       IcosahedralSphereMesh      UnitIcosahedralSphereMesh
  OctahedralSphereMesh       UnitOctahedralSphereMesh   CubedSphereMesh
  UnitCubedSphereMesh        TorusMesh                  AnnulusMesh
  SolidTorusMesh             CylinderMesh
Tip
如何查看函数或类的文档:
?<fun-name>help(<fun-name>)
from firedrake import CubeMesh
help(CubeMesh)
Tip
How to find the doc or help for functions/classes
?<fun-name>help(<fun-name>)
from firedrake import CubeMesh
help(CubeMesh)
Note
对于复杂的几何区域, 我们可以使用 Gmsh 构造并保存网格, 然后使用函数 Mesh 加载网格.
Note
For complex geometries, one can construct and save a mesh with Gmsh, then
load it with the function Mesh.
1.3. 函数空间创建 Creating function spaces#
先看例子: 在同一网格上创建标量, 向量和混合函数空间, 并查看自由度个数和单元信息.
Let us start with an example: create scalar, vector and mixed function spaces on the same mesh, and inspect the number of degrees of freedom and the element information.
from firedrake import *

mesh_fs = RectangleMesh(nx=8, ny=8, Lx=1, Ly=1)

V = FunctionSpace(mesh_fs, 'CG', degree=1)         # scalar P1 space
Vv = VectorFunctionSpace(mesh_fs, 'CG', degree=2)  # vector P2 space
W = V * Vv                                         # mixed space

print('dofs of V :', V.dim())
print('vertices  :', mesh_fs.num_vertices())       # P1: one dof per vertex
print('dofs of Vv:', Vv.dim())
print('dofs of W :', W.dim())

print('element of V :', V.ufl_element())
print('element of Vv:', Vv.ufl_element())
dofs of V : 81
vertices  : 81
dofs of Vv: 578
dofs of W : 659
element of V : <CG1 on a triangle>
element of Vv: <vector element with 2 components of <CG2 on a triangle>>
上面用到的三个构造函数:
FunctionSpace: 标量函数空间VectorFunctionSpace: 向量函数空间MixedFunctionSpace: 混合空间 (更常写作W = V * Vv)
注意输出中 V 的自由度个数恰好等于网格顶点数:
P1 元在每个顶点上有一个自由度.
向量空间的自由度按分量计, 因此 Vv (P2, 二维向量) 的自由度是
“顶点数 + 边数” 的两倍; 混合空间的自由度是各分量空间之和.
常用单元族速查表[1]:
简称 |
全名 |
连续性 |
典型用途 |
|---|---|---|---|
|
Lagrange |
连续 |
一般椭圆问题 |
|
Discontinuous Lagrange |
间断 |
对流占优问题, DG 方法 |
|
Raviart–Thomas / Brezzi–Douglas–Marini |
H(div) 协调 |
混合有限元, Darcy 流 |
|
Nédélec (第一类) |
H(curl) 协调 |
电磁问题 |
|
Real |
全局常数 |
Lagrange 乘子 |
其中 R 空间在整个网格上只有一个自由度, 表示全局常数,
本章 使用 Lagrange 乘子 一节中将用到它.
The three constructors used above:
FunctionSpace: scalar function spacesVectorFunctionSpace: vector function spacesMixedFunctionSpace: mixed function spaces (more commonly writtenW = V * Vv)
Note that the number of degrees of freedom of V equals the number of mesh
vertices: a P1 element carries one degree of freedom per vertex. Vector
spaces count degrees of freedom per component, so Vv (P2, 2D vectors) has
twice “vertices + edges” many; a mixed space has the sum of its components.
Cheat sheet of common element families[1]:
Family |
Full name |
Continuity |
Typical use |
|---|---|---|---|
|
Lagrange |
continuous |
general elliptic problems |
|
Discontinuous Lagrange |
discontinuous |
convection-dominated problems, DG methods |
|
Raviart–Thomas / Brezzi–Douglas–Marini |
H(div) conforming |
mixed finite elements, Darcy flow |
|
Nédélec (first kind) |
H(curl) conforming |
electromagnetics |
|
Real |
global constant |
Lagrange multipliers |
The R space has a single degree of freedom on the whole mesh and represents
a global constant; it is used in the section
Using a Lagrange multiplier of this chapter.
完整的单元列表参见For the full list of supported elements, see https://firedrakeproject.org/variational-problems.html#supported-finite-elements
注意区分 Function 与 TrialFunction/TestFunction:
后两者只是变分形式中的符号, 不存储数值;
Function 才是真正带自由度数值的有限元函数.
给 Function 赋值有三种常用方式:
interpolate (插值), project (投影, 可用于不同空间之间), assign (复制).
自由度数值可以通过 .dat.data 直接查看:
Distinguish Function from TrialFunction/TestFunction: the latter two
are purely symbolic objects in variational forms and store no values, while a
Function holds the actual degree-of-freedom values. Three common ways to
set the values of a Function are interpolate, project (which also works
between different spaces) and assign (copy). The values can be inspected
directly via .dat.data:
import numpy as np

x, y = SpatialCoordinate(mesh_fs)

w1 = Function(V, name='w1')
w1.interpolate(x*y)              # interpolate the expression

w2 = Function(V, name='w2')
w2.project(x*y)                  # L2 projection

w3 = Function(V, name='w3')
w3.assign(w1)                    # copy values from w1

print('first dofs of w1:', w1.dat.data[:5])
print('max |w1 - w3| =', np.abs(w1.dat.data - w3.dat.data).max())
first dofs of w1: [0.       0.       0.       0.015625 0.      ]
max |w1 - w3| = 0.0
Note
混合空间上取分量时注意复数形式:
TrialFunctions(W)/TestFunctions(W) 返回各分量符号,
而 TrialFunction(W) 返回整体; Function 的分量用
w.subfunctions (赋值/输出) 或 split(w) (用于变分形式).
u, p = TrialFunctions(W)
v, q = TestFunctions(W)
w = Function(W)
w0, w1 = w.subfunctions
NS 方程一章中有混合空间的完整例子.
Note
When working with mixed spaces, mind the plural forms:
TrialFunctions(W)/TestFunctions(W) return the component symbols, while
TrialFunction(W) returns the whole function. For a Function, use
w.subfunctions (for assignment/output) or split(w) (inside variational
forms) to access the components.
u, p = TrialFunctions(W)
v, q = TestFunctions(W)
w = Function(W)
w0, w1 = w.subfunctions
See the chapter on the Navier–Stokes equations for a complete example.
自由度在单元上的分布见 自由度的分布 Layout of degrees of freedom; 单元的 variant 参数见 FiniteElement 的 variant 参数示例 The variant argument of FiniteElement.For how degrees of freedom are laid out on cells see 自由度的分布 Layout of degrees of freedom; for the variant parameter of finite elements see FiniteElement 的 variant 参数示例 The variant argument of FiniteElement.
1.4. 变分形式的表示 Expressing variational forms#
回顾 简单完整示例 A complete minimal example 中的例子, 双线性形式和右端项如下:
a = inner(grad(u), grad(v))*dx
L = inner(f, v)*dx
这是变分形式
的逐字转写. Firedrake 使用 UFL (Unified Form Language, FEniCS 项目的一部分)[2] 来书写变分形式.
典型的变分形式由三类要素组成:
函数: 试探/检验函数 (
TrialFunction/TestFunction) 和已知函数;算子: 如
grad,inner, 作用在函数上, 得到被积表达式;测度: 如
dx,ds, 指明在哪里积分.
常见积分项与 UFL 代码的对照:
数学表达式 |
UFL 代码 |
|---|---|
\(\int_\Omega \nabla u \cdot \nabla v\) |
|
\(\int_\Omega u\, v\) |
|
\(\int_\Omega f\, v\) |
|
\(\int_{\partial\Omega} g\, v\) |
|
\(\int_\Omega ({\bf b}\cdot\nabla u)\, v\) |
|
不同的积分项直接用 + 相加. 下面依次介绍算子和测度.
Recall how the bilinear form and the right-hand side were written in 简单完整示例 A complete minimal example:
a = inner(grad(u), grad(v))*dx
L = inner(f, v)*dx
This is a literal transliteration of the variational form
Firedrake uses UFL (the Unified Form Language, part of the FEniCS project)[2] to express variational forms.
A variational form consists of three kinds of ingredients:
functions: trial/test functions (
TrialFunction/TestFunction) and known functions;operators: such as
gradandinner, acting on functions to give the integrand;measures: such as
dxandds, saying where to integrate.
Common integral terms and their UFL counterparts:
Mathematics |
UFL code |
|---|---|
\(\int_\Omega \nabla u \cdot \nabla v\) |
|
\(\int_\Omega u\, v\) |
|
\(\int_\Omega f\, v\) |
|
\(\int_{\partial\Omega} g\, v\) |
|
\(\int_\Omega ({\bf b}\cdot\nabla u)\, v\) |
|
Different integral terms are simply added with +. The operators and
measures are introduced below.
1.4.1. UFL 算子 UFL operators#
本章的例子只用到 inner 和 grad 两个算子.
常用 UFL 算子的完整列表折叠在下面 (内容摘编自 UFL 文档 [3]), 需要时查阅即可.
The examples in this chapter only use the operators inner and grad.
A full table of common UFL operators (adapted from the UFL documentation [3]) is collapsed below for reference.
UFL 算子详表 (点击展开)
下面我们列出常用的 UFL 算子, 更多细节请参考 UFL 的文档 [3].
dot张量缩并,
dot(u, v)对u的最后一个维度和v的第一个维度做缩并.inner张量内积(分量对应乘积之和). 对第二个张量取复共轭.
gradandnabla_gradgrad对张量求导, 新加维度为最后一个维度.
scalar
\[ {\rm grad}(u) = \nabla u = \frac{\partial u}{\partial x_i}{\bf e}_i \]vector
\[ {\rm grad}({\bf v}) = \nabla {\bf v} = \frac{\partial v_i}{\partial x_j}{\bf e}_i \otimes {\bf e}_j \]tensor
设 \(\bf T\) 为秩为 \(r\) 的张量, 那么
\[ {\rm grad}({\bf T}) = \nabla {\bf T} = \frac{\partial {\bf T}_\ell}{\partial x_i}{\bf e}_{\ell_1} \otimes\cdots\otimes {\bf e}_{\ell_r}\otimes {\bf e}_{i} \]其中 \(\ell\) 是长度为 \(r\) 的多指标 (multi-index).
nabla_grad类似
grad, 不过新加维度为第一个维度scalar (same with
grad)\[ {\rm nabla\_grad}(u) = \nabla u = \frac{\partial u}{\partial x_i}{\bf e}_i \]vector
\[ {\rm nabla\_grad}({\bf v}) = (\nabla {\bf v})^T = \frac{\partial v_j}{\partial x_i}{\bf e}_i \otimes {\bf e}_j \]tensor
设 \(\bf T\) 为秩为 \(r\) 的张量, 那么
\[ {\rm nabla\_grad}({\bf T}) = \frac{\partial {\bf T}_\ell}{\partial x_i}{\bf e}_{i}\otimes {\bf e}_{\ell_1} \otimes\cdots\otimes {\bf e}_{\ell_r} \]
divandnabla_divdiv对最后一个维度的偏导数进行缩并.
设 \(\bf T\) 为秩为 \(r\) 的张量, 那么 $\( {\rm div}({\bf T}) = \sum_i\frac{\partial {\bf T}_{\ell_1\ell_2\cdots\ell_{r-1} i}}{\partial x_i}{\bf e}_{\ell_1} \otimes\cdots\otimes {\bf e}_{\ell_{r-1}} \)$
nabla_div类似
div, 不过对第一个维度的偏导数进行缩并.
Note
两个关于梯度的表达式:
\((u\cdot\nabla) v\) →
dot(u, nabla_grad(v))ordot(grad(v), u)\(\Delta u\) →
div(grad(u))
Table of common UFL operators (click to expand)
Commonly used UFL operators are listed below; see the UFL documentation [3] for more details.
dotTensor contraction:
dot(u, v)contracts the last axis ofuwith the first axis ofv.innerInner product of tensors (the sum of the products of the components); the complex conjugate is taken on the second argument.
gradandnabla_gradgradDifferentiation of a tensor; the new axis is appended as the last axis.
scalar
\[ {\rm grad}(u) = \nabla u = \frac{\partial u}{\partial x_i}{\bf e}_i \]vector
\[ {\rm grad}({\bf v}) = \nabla {\bf v} = \frac{\partial v_i}{\partial x_j}{\bf e}_i \otimes {\bf e}_j \]tensor
Let \(\bf T\) be a tensor of rank \(r\); then
\[ {\rm grad}({\bf T}) = \nabla {\bf T} = \frac{\partial {\bf T}_\ell}{\partial x_i}{\bf e}_{\ell_1} \otimes\cdots\otimes {\bf e}_{\ell_r}\otimes {\bf e}_{i} \]where \(\ell\) is a multi-index of length \(r\).
nabla_gradLike
grad, but the new axis is prepended as the first axis.scalar (same as
grad)\[ {\rm nabla\_grad}(u) = \nabla u = \frac{\partial u}{\partial x_i}{\bf e}_i \]vector
\[ {\rm nabla\_grad}({\bf v}) = (\nabla {\bf v})^T = \frac{\partial v_j}{\partial x_i}{\bf e}_i \otimes {\bf e}_j \]tensor
Let \(\bf T\) be a tensor of rank \(r\); then
\[ {\rm nabla\_grad}({\bf T}) = \frac{\partial {\bf T}_\ell}{\partial x_i}{\bf e}_{i}\otimes {\bf e}_{\ell_1} \otimes\cdots\otimes {\bf e}_{\ell_r} \]
divandnabla_divdivContracts the derivative over the last axis.
Let \(\bf T\) be a tensor of rank \(r\); then $\( {\rm div}({\bf T}) = \sum_i\frac{\partial {\bf T}_{\ell_1\ell_2\cdots\ell_{r-1} i}}{\partial x_i}{\bf e}_{\ell_1} \otimes\cdots\otimes {\bf e}_{\ell_{r-1}} \)$
nabla_divLike
div, but contracts the derivative over the first axis.
Note
Two useful expressions involving gradients:
\((u\cdot\nabla) v\) →
dot(u, nabla_grad(v))ordot(grad(v), u)\(\Delta u\) →
div(grad(u))
1.4.2. 非线性函数 Basic nonlinear functions[4]#
abs,signpow,sqrtexp,lncos,sin, ……
1.4.3. 测度 Measures#
dx: 区域 \(\Omega\) 的内部 (单元积分, cell integral);ds: 区域的边界 \(\partial\Omega\) (外部面积分, exterior facet integral);dS: 内部面的集合 \(\Gamma\), 即区域内部相邻单元的公共边 (内部面积分, interior facet integral).
dx: the interior of the domain \(\Omega\) (cell integral);ds: the boundary \(\partial\Omega\) of \(\Omega\) (exterior facet integral);dS: the set of interior facets \(\Gamma\) (interior facet integral).
在区域内部的边界上积分时, 需要使用 dS 并使用限制算子 + 或 -, 如:
To integrate over interior facets, use dS together with the restriction
operators + or -, e.g.:
a = u('+')*v('+')*dS
1.4.4. 查看 UFL 形式 Inspecting UFL forms#
UFL 形式在内部表示为一棵表达式树. 定义好形式后, 可以使用 tree_format 打印其表达式树, 以检查所构造的形式是否符合预期.
A UFL form is internally represented as an expression tree. Once the form has been defined, you can use tree_format to print the expression tree and check whether the constructed form matches your expectations.
from firedrake import *
from ufl.utils.formatting import tree_format

N = 8
test_mesh = RectangleMesh(nx=N, ny=N, Lx=1, Ly=1)
V = FunctionSpace(test_mesh, 'CG', degree=1)
u, v = TrialFunction(V), TestFunction(V)
a = inner(grad(u), grad(v))*dx + inner(Constant(0), v)*dx

print(tree_format(a))
Form:
    Integral:
        integral type: cell
        subdomain id: everywhere
        integrand:
            Conj
                Inner
                (
                    Grad
                        Argument(WithGeometry(FunctionSpace(<firedrake.mesh.MeshTopology object at 0x7ff59d9b7ad0>, FiniteElement('Lagrange', triangle, 1), name=None), Mesh(VectorElement(FiniteElement('Lagrange', triangle, 1), dim=2), 23)), 0, None)
                    Grad
                        Argument(WithGeometry(FunctionSpace(<firedrake.mesh.MeshTopology object at 0x7ff59d9b7ad0>, FiniteElement('Lagrange', triangle, 1), name=None), Mesh(VectorElement(FiniteElement('Lagrange', triangle, 1), dim=2), 23)), 1, None)
                )
    Integral:
        integral type: cell
        subdomain id: everywhere
        integrand:
            Product
            (
                Conj
                    Argument(WithGeometry(FunctionSpace(<firedrake.mesh.MeshTopology object at 0x7ff59d9b7ad0>, FiniteElement('Lagrange', triangle, 1), name=None), Mesh(VectorElement(FiniteElement('Lagrange', triangle, 1), dim=2), 23)), 0, None)
                Constant([0.], name='constant_7', count=7)
            )
1.5. 线性方程组参数设置 Configuring linear solvers#
本节介绍线性求解器参数、三种求解接口以及命令行参数的用法.
This section introduces linear solver parameters, three solver interfaces, and command-line options.
1.5.1. 选择求解方法 Choosing a solver#
仍以 Poisson 方程为例. 先定义后面三种接口共用的变分形式和边界条件.
We continue with the Poisson equation. First define the variational forms and boundary condition shared by the three interfaces below.
from firedrake import *

mesh = UnitSquareMesh(8, 8)
V = FunctionSpace(mesh, 'CG', 1)
u, v = TrialFunction(V), TestFunction(V)
a = inner(grad(u), grad(v))*dx
L = v*dx
bc = DirichletBC(V, 0, 'on_boundary')

solver_parameters = {
    'ksp_type': 'cg',
    'pc_type': 'gamg',
}

u_h = Function(V, name='u_h')
solve(a == L, u_h, bcs=bc,
      solver_parameters=solver_parameters)
solver_parameters 是传给 PETSc 的参数字典. PETSc 的线性求解器主要由 KSP 和 PC 两部分组成: ksp_type 设置迭代方法, pc_type 设置预条件子. Poisson 问题常用 cg 和 gamg[5].
参数 |
作用 |
|---|---|
|
设置迭代方法 |
|
设置预条件子 |
|
输出收敛或发散原因 |
|
输出每步迭代的残差 |
|
求解后输出 KSP 和 PC 配置 |
solver_parameters is a dictionary of PETSc options. A PETSc linear solver mainly consists of KSP and PC: ksp_type selects the iterative method and pc_type selects the preconditioner. cg and gamg[5] are commonly used for the Poisson problem.
Option |
Purpose |
|---|---|
|
set the iterative method |
|
set the preconditioner |
|
print the reason for convergence or divergence |
|
print the residual at every iteration |
|
print the KSP and PC configuration after solving |
Note
小规模问题也可使用直接法: ksp_type='preonly', pc_type='lu'. 若使用 MUMPS, 再设置 pc_factor_mat_solver_type='mumps'.
Note
A direct method can also be used for small problems: set ksp_type='preonly' and pc_type='lu'. To use MUMPS, also set pc_factor_mat_solver_type='mumps'.
进阶: ksp_view 的输出方式 (点击展开)
ksp_view 会在每次 KSPSolve 结束后调用 KSPView, 输出实际使用的 KSP 类型、收敛容差以及其中的 PC 和矩阵信息[6]. 常见命令行写法为:
-ksp_view                       # 求解后打印 KSP + PC 概要
-ksp_view ::ascii_info_detail   # 详细模式, 输出实现支持的更多内部信息
-ksp_view :ksp.txt              # 将输出写入 ksp.txt
详细模式可显示分解填充率、子求解器或 MUMPS 控制参数等实现所提供的信息. 在 solver_parameters 中, 上述三种写法分别对应 'ksp_view': None、'ksp_view': '::ascii_info_detail' 和 'ksp_view': ':ksp.txt'. 若设置了 options_prefix, 命令行参数也要添加相同前缀.
Advanced: output modes of ksp_view (click to expand)
ksp_view calls KSPView at the end of every KSPSolve, printing the KSP type and tolerances together with information about the contained PC and matrix[6]. Common command-line forms are:
-ksp_view                       # print a KSP + PC summary after solving
-ksp_view ::ascii_info_detail   # request implementation-specific details
-ksp_view :ksp.txt              # write the output to ksp.txt
Where supported, the detailed format can include factor fill ratios, subsolvers, or MUMPS control parameters. In solver_parameters, the three forms correspond to 'ksp_view': None, 'ksp_view': '::ascii_info_detail', and 'ksp_view': ':ksp.txt', respectively. If options_prefix is set, add the same prefix to the command-line option.
1.5.2. 三种求解接口 Three solver interfaces#
同一个线性变分问题可以使用下面三种接口求解.
The same linear variational problem can be solved through the following three interfaces.
1.5.2.1. solve(a == L, ...) solve(a == L, ...)#
直接使用 solve, 适合只求解一次的情况.
Call solve directly for a one-off solve.
u_direct = Function(V, name='u_direct')
solve(a == L, u_direct, bcs=bc,
      solver_parameters=solver_parameters)
1.5.2.2. assemble 后求解 Solve after assemble#
先显式组装 \(A\) 和 \(\mathbf b\), 再调用 solve(A, u, b). 这种写法可以直接访问矩阵和向量.
First assemble \(A\) and \(\mathbf b\) explicitly, then call solve(A, u, b). This form gives direct access to the matrix and vector.
A = assemble(a, bcs=bc)
b = assemble(L, bcs=bc)
u_assembled = Function(V, name='u_assembled')
solve(A, u_assembled, b,
      solver_parameters=solver_parameters)
1.5.2.3. LinearVariationalSolver LinearVariationalSolver#
将变分问题和求解器分别保存为对象. 更新系数、右端项或边界数据后, 可以再次调用 solver.solve().
Store the variational problem and solver as separate objects. After updating coefficients, the right-hand side, or boundary data, call solver.solve() again.
u_reusable = Function(V, name='u_reusable')
problem = LinearVariationalProblem(a, L, u_reusable, bcs=bc)
solver = LinearVariationalSolver(
    problem, solver_parameters=solver_parameters)
solver.solve()
三种接口的适用范围:
需求 |
建议接口 |
|---|---|
代码尽量简短, 只求解一次 |
|
需要访问矩阵和向量 |
|
更新数据后重复求解 |
|
Typical uses of the three interfaces:
Requirement |
Recommended interface |
|---|---|
keep the code short and solve once |
|
access the matrix and vector |
|
solve repeatedly after updating data |
|
1.5.3. 代码参数与命令行参数 Parameters in code and on the command line#
命令行参数会覆盖 solver_parameters 中的设置. 使用 options_prefix 区分程序中的不同求解器.
代码中的字典项 |
|
|---|---|
|
|
|
|
Command-line options override settings in solver_parameters. Use options_prefix to distinguish different solvers in a program.
Dictionary entry in code |
Command-line option with |
|---|---|
|
|
|
|
配套脚本 py/possion_example1.py 设置了 options_prefix='poisson'. 命令行写法如下:
The companion script py/possion_example1.py sets options_prefix='poisson'. The command-line form is:
python py/possion_example1.py \
    -poisson_ksp_monitor -poisson_ksp_converged_reason \
    -poisson_ksp_type cg -poisson_pc_type jacobi
若省略 options_prefix, Firedrake 会自动创建一个唯一前缀, 因此不能直接使用无前缀的 -ksp_type cg. 需要使用无前缀的命令行参数时, 将前缀显式设为空字符串 options_prefix=''; 此时可使用 -ksp_type cg、-pc_type gamg 等参数.
If options_prefix is omitted, Firedrake creates a unique prefix automatically, so an unprefixed -ksp_type cg cannot be used directly. To use unprefixed command-line options, explicitly set an empty prefix with options_prefix=''; options such as -ksp_type cg and -pc_type gamg can then be used.
See also
命令行配置的完整说明见 Firedrake: 配置求解器.
See also
For the complete command-line configuration rules, see Firedrake: configuring solvers.
1.5.4. 检查求解器收敛状态 Checking solver convergence#
使用 ksp_converged_reason 输出收敛状态; 设置 ksp_error_if_not_converged 后, 求解器不收敛时程序会报错.
Use ksp_converged_reason to print the convergence status. With ksp_error_if_not_converged, the program raises an error if the solver does not converge.
diagnostic_parameters = {
    'ksp_type': 'cg',
    'pc_type': 'gamg',
    'ksp_converged_reason': None,
    'ksp_error_if_not_converged': None,
}

u_checked = Function(V, name='u_checked')
solve(a == L, u_checked, bcs=bc,
      solver_parameters=diagnostic_parameters,
      options_prefix='poisson_checked')
Linear poisson_checked_ solve converged due to CONVERGED_RTOL iterations 7
ksp_converged_reason: 输出收敛或发散原因.ksp_error_if_not_converged: 不收敛时抛出错误.ksp_monitor: 输出每步迭代的残差.
1.6. Dirichlet 边界条件 Dirichlet boundary conditions#
在 Firedrake 中, 使用 DirichletBC 类施加 Dirichlet 边界条件. 基本写法为 DirichletBC(V, g, sub_domain), 其中 V 是函数空间, g 是给定的边界值, sub_domain 指定边界范围. g 可以是常数、UFL 表达式或 Function.
求解变分问题时, 通过 bcs 参数将边界条件传给求解器.
In Firedrake, a Dirichlet boundary condition is imposed using the DirichletBC class. The basic form is DirichletBC(V, g, sub_domain), where V is the function space, g is the prescribed boundary value, and sub_domain selects the boundary. The value g can be a constant, a UFL expression, or a Function.
Pass the boundary condition to the solver through the bcs argument.
1.6.1. 内置网格的边界标记 Boundary tags of built-in meshes#
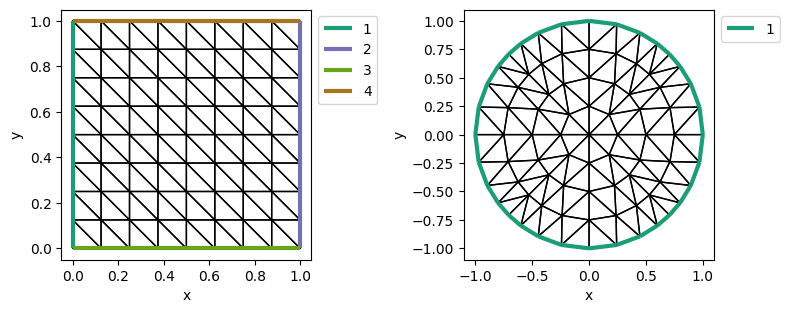
Firedrake 的内置网格带有预先定义的边界标记 (编号). 这些边界标记可以直接传给 DirichletBC 的 sub_domain 参数. 例如, RectangleMesh 的四条边依次标记为 1 到 4:
Firedrake’s built-in meshes have predefined boundary tags (integer labels). These labels can be passed directly to the sub_domain argument of DirichletBC. For example, the four sides of a RectangleMesh are tagged 1–4:
标记 Label |
边界 Boundary |
|---|---|
1 |
\(x=0\) |
2 |
\(x=L_x\) |
3 |
\(y=0\) |
4 |
\(y=L_y\) |
下面用不同颜色画出边界标记.
The following plots show the boundary tags in different colors.
from firedrake import *
import matplotlib.pyplot as plt
from py.intro_utils import plot_mesh_with_label

N = 8
rect_mesh = RectangleMesh(nx=N, ny=N, Lx=1, Ly=1)
circ_mesh = UnitDiskMesh(2)

fig, ax = plt.subplots(1, 2, figsize=[8, 4])
plot_mesh_with_label(rect_mesh, axes=ax[0])
plot_mesh_with_label(circ_mesh, axes=ax[1])
fig.tight_layout()
1.6.2. 施加 Dirichlet 边界条件 Applying Dirichlet boundary conditions#
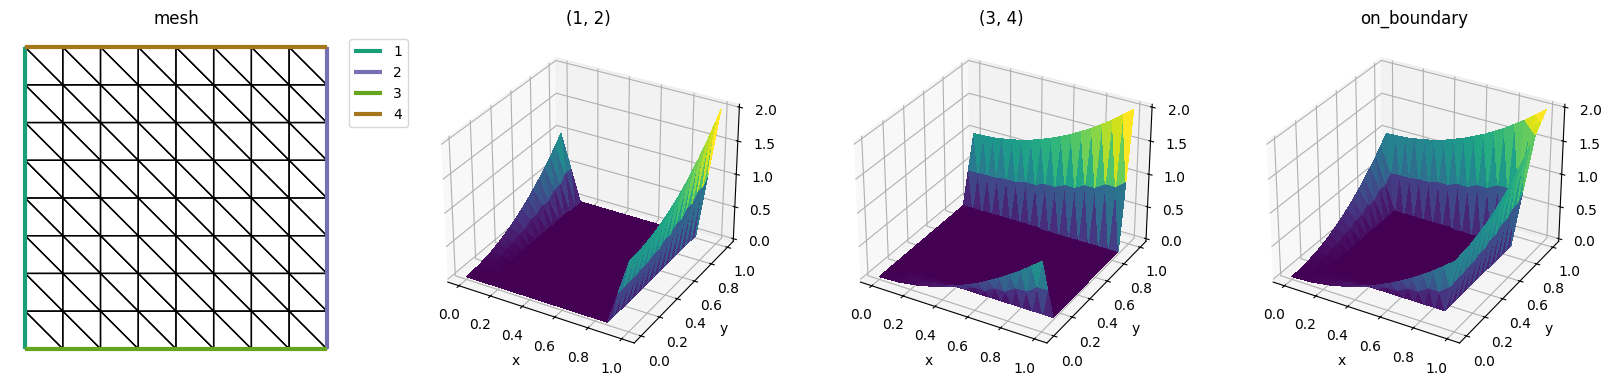
下面取 \(g=x^2+y^2\), 分别在左右边界 (1, 2)、上下边界 (3, 4) 和整个边界 'on_boundary' 上施加条件. 这里调用 bc.apply(g_h) 是为了将边界值写入函数并画出来; 求解方程时通常写作 solve(..., bcs=bc).
The following example takes \(g=x^2+y^2\) and imposes it on the left and right sides (1, 2), the bottom and top sides (3, 4), and the whole boundary 'on_boundary'. Here bc.apply(g_h) writes the boundary values into a function for plotting; when solving an equation, normally use solve(..., bcs=bc).
N = 8
test_mesh = RectangleMesh(nx=N, ny=N, Lx=1, Ly=1)
x, y = SpatialCoordinate(test_mesh)

g = x**2 + y**2
V = FunctionSpace(test_mesh, 'CG', degree=1)


def trisurf_bdy_condition(V, g, sub_domain, axes=None):
    bc = DirichletBC(V, g=g, sub_domain=sub_domain)
    g_h = Function(V)
    bc.apply(g_h)

    trisurf(g_h, axes=axes)
    if axes:
        axes.set_xlabel('x')
        axes.set_ylabel('y')
        axes.set_title(sub_domain)
# plot the mesh and boundary conditions
fig, ax = plt.subplots(1, 4, figsize=[16, 4], subplot_kw=dict(projection='3d'))
ax = ax.flat

ax[0].remove()
ax[0] = fig.add_subplot(1, 4, 1)
plot_mesh_with_label(test_mesh, ax[0])
ax[0].set_title('mesh')
ax[0].axis('off')

sub_domains = [(1, 2), (3, 4), 'on_boundary']
for i in range(3):
    trisurf_bdy_condition(V, g=g, sub_domain=sub_domains[i], axes=ax[i+1])
fig.tight_layout()
1.6.3. DirichletBC 的 sub_domain 参数 The sub_domain argument of DirichletBC#
常用的 sub_domain 写法如下:
写法 |
选择的边界 |
|---|---|
|
标记为 1 的边界 |
|
标记为 1 和 2 的边界 |
|
整个外边界 |
边界编号来自网格本身. 使用某个编号前, 应先确认网格中存在相应标记. 对初学者而言, 上述三种写法通常已经足够. 若需要在三维网格中进一步区分面、边和顶点, 可以使用嵌套元组; 请参考以下摘自 firedrake/bcs.py 的注释:
Common forms of sub_domain are:
Form |
Selected boundary |
|---|---|
|
the boundary tagged 1 |
|
the boundaries tagged 1 and 2 |
|
the whole exterior boundary |
Boundary numbers come from the mesh itself, so check that a tag exists before using it. The three forms above are sufficient for most introductory examples. For three-dimensional meshes, nested tuples can further distinguish facets, edges, and vertices; see the following comments from firedrake/bcs.py:
# Define facet, edge, vertex using tuples:
# Ex in 3D:
#           user input                                                         returned keys
# facet  = ((1, ), )                   ->     ((2, ((1, ), )), (1, ()),         (0, ()))
# edge   = ((1, 2), )                  ->     ((2, ()),        (1, ((1, 2), )), (0, ()))
# vertex = ((1, 2, 4), )               ->     ((2, ()),        (1, ()),         (0, ((1, 2, 4), ))
#
# Multiple facets:
# (1, 2, 4) := ((1, ), (2, ), (4,))   ->     ((2, ((1, ), (2, ), (4, ))), (1, ()), (0, ()))
#
# One facet and two edges:
# ((1,), (1, 3), (1, 4))              ->     ((2, ((1,),)), (1, ((1,3), (1, 4))), (0, ()))
1.6.4. Gmsh 网格的边界标记 Boundary tags in Gmsh meshes#
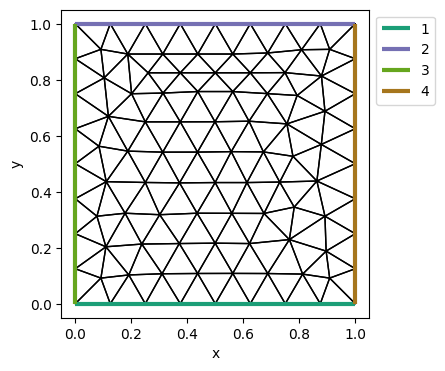
对于由 Gmsh 生成的网格, 边界编号需要在生成网格时设置. Gmsh 使用 Physical Group 标记计算区域和边界, 保存 .msh 文件时, 这些标记会一同写入网格.
下面以单位正方形为例, 几何文件 gmsh/rectangle.geo 的内容如下. 在二维网格中, 边界线用 Physical Curve 标记, 计算区域用 Physical Surface 标记. 四条边的编号依次为 1 到 4, 区域的编号为 1. 曲线和曲面属于不同维度, 因此它们可以使用相同的编号.
For meshes generated by Gmsh, boundary tags must be assigned when the mesh is created. Gmsh uses Physical Groups to mark the computational domain and its boundaries, and stores these tags in the .msh file.
The following unit-square example, defined in the geometry file gmsh/rectangle.geo, uses Physical Curve to mark the boundary lines of a two-dimensional mesh and Physical Surface to mark the domain. The four boundaries have tags 1–4, while the domain has tag 1. Curves and surfaces have different dimensions, so they may use the same tag.
// Gmsh project created on Tue Sep 30 15:09:53 2022
SetFactory("OpenCASCADE");
//+
Rectangle(1) = {0, 0, 0, 1, 1, 0};
//+
Physical Curve("lower", 1) = {1};
//+
Physical Curve("upper", 2) = {3};
//+
Physical Curve("left", 3) = {4};
//+
Physical Curve("right", 4) = {2};
//+
Physical Surface("domain", 1) = {1};
用 Mesh 读入网格文件 gmsh/rectangle.msh 后, Firedrake 会保留这些 Physical Tag. 边界编号既可以传给 DirichletBC 的 sub_domain 参数, 也可以用在 ds(id) 中指定边界积分; 区域编号则可以用在 dx(id) 中, 表示只在编号对应的子区域上积分. 下面画出网格并检查各条边的编号.
After the mesh file gmsh/rectangle.msh is loaded with Mesh, Firedrake retains these Physical Tags. A boundary tag can be passed to the sub_domain argument of DirichletBC, or used in ds(id) to select a boundary integral; a domain tag can be used in dx(id) to restrict an integral to the corresponding subdomain. The following plot shows the tag assigned to each boundary.
from firedrake import *
from firedrake.petsc import PETSc
from py.intro_utils import plot_mesh_with_label

# opts = PETSc.Options()
# opts.insertString('-dm_plex_gmsh_mark_vertices True')

gmsh_mesh = Mesh('gmsh/rectangle.msh')
plot_mesh_with_label(gmsh_mesh)
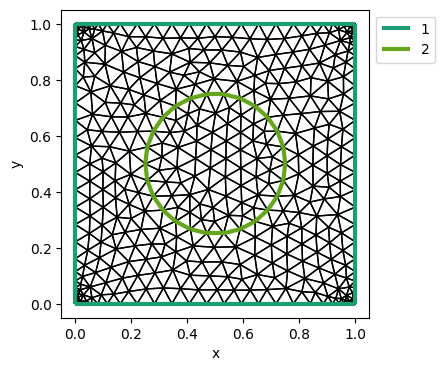
也可以在 Python 中使用 Gmsh Python SDK 或 pygmsh 创建几何、设置 Physical Group 并生成网格. 脚本 py/make_mesh_circle_in_rect.py 生成一个由圆形界面分成两个区域的矩形网格, 其中外边界编号为 1, 圆形界面编号为 2, 圆外和圆内区域的编号分别为 1 和 2. 借助区域编号, dx(1) 和 dx(2) 就可以分别在圆外和圆内区域上积分.
为了便于重复构建, 这里直接读取仓库中预先生成的网格文件 gmsh/circle_in_rect.msh. 取消下一代码单元中的注释即可重新生成网格.
The Gmsh Python SDK or pygmsh can also be used to create the geometry, define Physical Groups, and generate the mesh in Python. The script py/make_mesh_circle_in_rect.py creates a rectangular mesh split into two regions by a circular interface. The outer boundary has tag 1, the circular interface has tag 2, and the regions outside and inside the circle have tags 1 and 2 respectively, so dx(1) and dx(2) integrate over the two subdomains.
For reproducible builds, this notebook reads the pre-generated mesh file gmsh/circle_in_rect.msh included in the repository. Uncomment the indicated line in the next code cell to regenerate the mesh.
from firedrake import *
from py.intro_utils import plot_mesh_with_label
from py.make_mesh_circle_in_rect import make_circle_in_rect

h = 1/16
filename = 'gmsh/circle_in_rect.msh'
# make_circle_in_rect(h, filename, p=3, gui=False)

cr_mesh = Mesh(filename)
plot_mesh_with_label(cr_mesh)
1.7. Neumann 边界条件 Neumann boundary conditions#
在变分形式中, Neumann 边界条件通过边界积分 \(\int_{\partial\Omega_N} g_N v\) 自然引入, 不需要类似 DirichletBC 的对象, 因此也称为自然边界条件. 本节求解纯 Neumann 边界条件的 Poisson 方程
In the variational form, a Neumann boundary condition enters naturally through the boundary integral \(\int_{\partial\Omega_N} g_N v\); no object like DirichletBC is required, which is why it is also called a natural boundary condition. This section solves the Poisson equation with a pure Neumann boundary condition:
方程和边界条件中只出现 \(u\) 的导数: 若 \(u\) 是解, 则 \(u\) 加任意常数也是解. 为了确定唯一解, 在变分问题中附加零均值条件 \(\int_\Omega u = 0\).
变分问题
求 \(u \in H^1\), 且 \(\int_\Omega u = 0\) 使得
Only derivatives of \(u\) appear in the equation and the boundary condition: if \(u\) is a solution, so is \(u\) plus any constant. To pin down a unique solution, the variational problem includes the zero-mean condition \(\int_\Omega u = 0\).
Variational problem
Find \(u \in H^1\) with \(\int_\Omega u = 0\) such that
兼容性条件
Compatibility condition
在变分问题中取 \(v \equiv 1\) 即得该条件.This follows from taking \(v \equiv 1\) in the variational problem.
下面介绍两种求解方法: 把系数矩阵的零空间告诉求解器, 或引入 Lagrange 乘子. 为了检验计算结果, 两种方法求解同一个有真解的算例: 取零均值的真解 \(u = x^2 - 1/3\), 相应地 \(f = -2\); \(\partial u/\partial n\) 在右边界 (编号为 2) 上等于 \(2\), 在其余边界上为 \(0\). 这组数据恰好满足兼容性条件.
Two approaches are introduced below: informing the solver of the nullspace of the matrix, or introducing a Lagrange multiplier. To verify the results, both methods solve the same problem with a known exact solution: the zero-mean solution \(u = x^2 - 1/3\), for which \(f = -2\), while \(\partial u/\partial n\) equals \(2\) on the right boundary (tag 2) and \(0\) on the other boundaries. These data satisfy the compatibility condition exactly.
1.7.1. 通过 nullspace 求解 Solving with a nullspace#
离散后的线性方程组是奇异的: 系数矩阵作用在常数向量上得到零, 即矩阵的零空间由常数向量构成. 用 VectorSpaceBasis(constant=True) 表示常数零空间, 通过 solve 的 nullspace 参数告诉求解器, 迭代法就能正常求解[7]. 参数 transpose_nullspace 给出转置矩阵的零空间[8], 用于把右端项中与之平行的分量投影掉; 这里矩阵对称, 两个参数传入同一个零空间即可.
迭代法得到的解一般不满足 \(\int_\Omega u = 0\): 它是解向量范数最小的解[9], 因此求解后先减去均值, 再与真解比较. 下面沿用 1.5 节的 cg + gamg 求解两次 —— 一次只设置 nullspace, 一次同时设置 transpose_nullspace —— 并输出两个解与真解的 \(L^2\) 误差.
The discrete linear system is singular: the matrix maps constant vectors to zero, so its nullspace consists of the constant vectors. Represent this nullspace with VectorSpaceBasis(constant=True) and pass it to solve via the nullspace argument, so that the iterative solver can handle the singular system[7]. The transpose_nullspace argument gives the nullspace of the transposed matrix[8], used to project the parallel component out of the right-hand side; the matrix here is symmetric, so the same basis serves both arguments.
The solution returned by the iterative solver does not satisfy \(\int_\Omega u = 0\) in general: it is the solution with minimal coefficient-vector norm[9]. The mean value is therefore subtracted before comparing with the exact solution. The code below solves twice with the cg + gamg setup from Section 1.5 — once with only nullspace, once with transpose_nullspace as well — and prints the \(L^2\) error of each solution against the exact one.
from firedrake import *
import matplotlib.pyplot as plt

N = 8
test_mesh = RectangleMesh(nx=N, ny=N, Lx=1, Ly=1)
x, y = SpatialCoordinate(test_mesh)

# Manufactured solution: u = x^2 - 1/3, f = -2,
# g_N = 2 on the right boundary (tag 2) and 0 elsewhere
u_exact = x**2 - 1/3
f = Constant(-2)
g = Constant(2)

V = FunctionSpace(test_mesh, 'CG', degree=1)
u, v = TrialFunction(V), TestFunction(V)
a = inner(grad(u), grad(v))*dx
L = inner(f, v)*dx + inner(g, v)*ds(2)

solver_parameters = {
    'ksp_type': 'cg',
    'pc_type': 'gamg',
    'ksp_converged_reason': None,
}

nullspace = VectorSpaceBasis(constant=True, comm=test_mesh.comm)

u1_h = Function(V, name='u1_h')
solve(a == L, u1_h, solver_parameters=solver_parameters,
      options_prefix='only_nullspace',
      nullspace=nullspace)

u2_h = Function(V, name='u2_h')
solve(a == L, u2_h, solver_parameters=solver_parameters,
      options_prefix='with_transpose',
      nullspace=nullspace,
      transpose_nullspace=nullspace)

# Subtract the mean value before comparing with the exact solution
omega = assemble(Constant(1)*dx(domain=test_mesh))
for u_h in (u1_h, u2_h):
    s = assemble(u_h*dx)/omega
    u_h.assign(u_h - s)

print('L2 error (only nullspace):     ', errornorm(u_exact, u1_h))
print('L2 error (transpose nullspace):', errornorm(u_exact, u2_h))

fig, ax = plt.subplots(1, 2, figsize=[8, 4], subplot_kw=dict(projection='3d'))
ts1 = trisurf(u1_h, axes=ax[0])
title1 = ax[0].set_title('only nullspace')
ts2 = trisurf(u2_h, axes=ax[1])
title2 = ax[1].set_title('transpose nullspace')
    Linear only_nullspace_ solve converged due to CONVERGED_RTOL iterations 8
    Linear with_transpose_ solve converged due to CONVERGED_RTOL iterations 8
L2 error (only nullspace):      0.0015942894850866605
L2 error (transpose nullspace): 0.001594289485086626
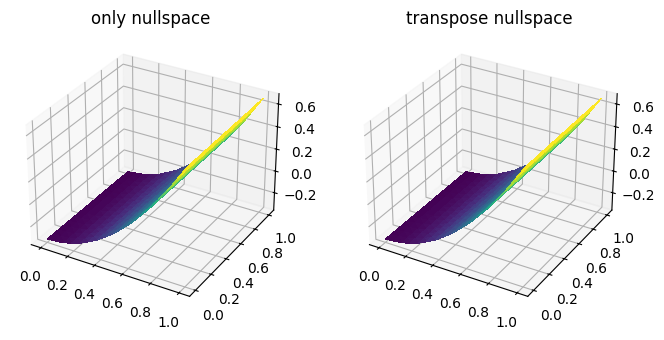
两个误差完全一致: 数据在离散意义下满足兼容性条件时, 右端项落在矩阵的值域内, 设不设置 transpose_nullspace 都能收敛.
The two errors coincide: when the data satisfy the compatibility condition in the discrete sense, the right-hand side lies in the range of the matrix, and the solve converges with or without transpose_nullspace.
进阶: nullspace 与直接法 (点击展开)
Firedrake 最终通过 PETSc 的 MatSetNullSpace 将 nullspace 附加到矩阵上.
PETSc 的 KSP 在左预条件下每次应用预条件子之后都会调用 MatNullSpaceRemove, 从预条件子的输出中投影掉零空间分量.
因此这个投影对 preonly + lu 配置也生效. 但是 nullspace 不参与 LU 分解, 分解器面对的仍是奇异矩阵.
通用 LU 可能因零主元 (zero pivot) 失败. 如果没有明确配置分解器处理奇异性, 即使分解成功, 结果也会依赖其主元策略.
所以对于奇异矩阵:
nullspace主要用于 CG、GMRES 等迭代法,使用直接法时, 还必须配置因子分解器本身.
若使用 MUMPS 求解相容的奇异系统, 可以开启零主元检测:
-ksp_type preonly -pc_type lu \
-pc_factor_mat_solver_type mumps \
-mat_mumps_icntl_24 1 -mat_mumps_cntl_3 1e-12
MUMPS 默认并不开启这项功能: ICNTL(24) 的默认值是 0, 设为 1 才会检测零主元行. CNTL(3) 的默认值是 0.0; 在 MUMPS 5.8 中, 启用零主元检测后, 0.0 表示根据机器精度、消元树深度和预处理矩阵的范数自动计算阈值, 并非使用零阈值. 若 CNTL(3)=c>0, 实际阈值为 \(c\lVert A_{\mathrm{pre}}\rVert_\infty\); 若 c<0, 则以 \(|c|\) 作为绝对阈值. 因此上面的 1e-12 是相对阈值系数, 它显式覆盖了默认的自动选择[10].
即使不启用 ICNTL(24), MUMPS 有时也能完成奇异系统的分解. 这种成功依赖矩阵规模、排序、缩放和浮点误差, 不能代替显式的零主元检测.
另一种做法是先消除奇异性: 例如用 MatZeroRowsColumns 固定一个自由度 (常见于纯 Neumann 问题或压力场), 或采用后文的 Lagrange 乘子方法显式规定归一化条件. -pc_factor_shift_type NONZERO 也可以给零主元添加非零位移; 但这是对算子的正则化, 会改变原系统, 结果依赖位移量.
若需要查看 KSP、PC 和因子分解器的详细配置, 可以使用命令行参数 -ksp_view ::ascii_info_detail.
下面默认折叠的代码单元演示 PETSc 内置 LU 的失败, 以及显式开启零主元检测后的 MUMPS 求解.
下面的代码设置了 options_prefix='lu_mumps', 因此查看求解器配置的命令行参数是 -lu_mumps_ksp_view ::ascii_info_detail. 它的输出会包括 MUMPS 实际采用的控制参数.
Advanced: nullspaces and direct solvers (click to expand)
Firedrake ultimately attaches nullspace to the matrix through PETSc’s MatSetNullSpace. With left preconditioning, PETSc’s KSP calls MatNullSpaceRemove after each application of the preconditioner and projects the nullspace component out of its output. This projection therefore also applies to a preonly + lu configuration. However, nullspace does not participate in the LU factorization, so the factorization package still sees a singular matrix.
A general-purpose LU factorization may fail with a zero pivot. Unless the factorization package is explicitly configured to handle singularity, even a successful result depends on its pivoting strategy. Thus, for singular matrices:
nullspaceis intended primarily for iterative methods such as CG and GMRES;a direct method additionally requires the factorization package itself to be configured.
When using MUMPS to solve a compatible singular system, null-pivot detection can be enabled as follows:
-ksp_type preonly -pc_type lu \
-pc_factor_mat_solver_type mumps \
-mat_mumps_icntl_24 1 -mat_mumps_cntl_3 1e-12
This feature is disabled by default: ICNTL(24) defaults to 0 and must be set to 1 to detect null pivot rows. CNTL(3) defaults to 0.0; in MUMPS 5.8, once null-pivot detection is enabled, 0.0 selects a threshold computed automatically from machine precision, the elimination-tree depth, and the norm of the preprocessed matrix—it does not mean a zero threshold. For CNTL(3)=c>0, the effective threshold is \(c\lVert A_{\mathrm{pre}}\rVert_\infty\); for c<0, the absolute threshold is \(|c|\). Thus 1e-12 above is a relative threshold coefficient that overrides the automatic default[10].
Even with ICNTL(24) disabled, MUMPS may sometimes complete the factorization of a singular system. Such success depends on the matrix size, ordering, scaling, and floating-point effects, and is no substitute for explicit null-pivot detection.
Alternatively, remove the singularity first: fix one degree of freedom with MatZeroRowsColumns (as is common for pure Neumann problems or pressure fields), or impose a normalization explicitly using the Lagrange-multiplier method later in this chapter. -pc_factor_shift_type NONZERO can also add a nonzero shift to a zero pivot, but this regularizes the operator and changes the original system, so the result depends on the shift amount.
To inspect the detailed KSP, PC, and factorization configuration, use the command-line option -ksp_view ::ascii_info_detail.
The collapsed code cell below demonstrates the failure of PETSc’s built-in LU and the MUMPS solve with null-pivot detection explicitly enabled. It sets options_prefix='lu_mumps', so the corresponding option for viewing the solver configuration is -lu_mumps_ksp_view ::ascii_info_detail. The output includes the MUMPS control parameters actually in use.
进阶: 关于 transpose_nullspace (点击展开)
真正需要 transpose_nullspace 的情形是右端项不相容 —— 例如数据本身不满足兼容性条件, 或数值积分和舍入误差引入了不相容分量. 此时残差中有一个迭代无法消去的分量, 求解器不能收敛到容差; 设置 transpose_nullspace 后, 该分量被投影掉, 迭代恢复收敛, 得到的是与原右端项最接近的相容问题的解.
下面默认折叠的代码单元故意去掉右端的边界通量项, 使数据不相容. 只设置 nullspace 时求解发散, Firedrake 抛出 ConvergenceError; 补上 transpose_nullspace 后迭代收敛, 但解到真解的误差很大 —— 它是投影后那个相容问题的解. 可见 transpose_nullspace 保证的是迭代收敛, 并不能代替相容的数据.
Advanced: about transpose_nullspace (click to expand)
transpose_nullspace is really needed when the right-hand side is incompatible — for instance, when the data violate the compatibility condition, or when quadrature and round-off errors introduce an incompatible component. The residual then contains a component that the iteration can never eliminate, and the solver fails to reach the tolerance; with transpose_nullspace set, this component is projected out and the iteration converges again, yielding the solution of the compatible problem closest to the original right-hand side.
The collapsed code cell below deliberately drops the boundary flux term so that the data become incompatible. With only nullspace set, the solve diverges and Firedrake raises a ConvergenceError; with transpose_nullspace added, the iteration converges, but the error against the exact solution is large — it solves the projected compatible problem. transpose_nullspace thus guarantees convergence of the iteration; it is no substitute for compatible data.
1.7.2. 使用 Lagrange 乘子 Using a Lagrange multiplier#
极值问题
纯 Neumann 问题等价于带约束的极值问题: 求 \(u \in H^1\) 满足
Minimization problem
The pure Neumann problem is equivalent to a constrained minimization problem: find \(u \in H^1\) such that
引入乘子
引入乘子 \(\mu \in \mathbb{R}\), 把约束并入目标函数:
Introducing a multiplier
Introduce a multiplier \(\mu \in \mathbb{R}\) and build the constraint into the objective:
约束由对 \(\mu\) 取最大实现:
The constraint is enforced by maximizing over \(\mu\):
违反约束的 \(u\) 被 “罚” 成 \(+\infty\), 于是先对 \(\mu\) 取最大、再对 \(u\) 取极小, 恰好重现上面带约束的极值问题. 解 \((u, \mu)\) 是 \(\tilde J\) 的鞍点: \(\tilde J\) 在 \(u\) 方向取极小, 在 \(\mu\) 方向取极大.
Any \(u\) violating the constraint is “penalized” to \(+\infty\), so maximizing over \(\mu\) first and then minimizing over \(u\) reproduces the constrained minimization problem above. The solution \((u, \mu)\) is a saddle point of \(\tilde J\): it attains a minimum in the \(u\) direction and a maximum in the \(\mu\) direction.
求变分
设 \(v \in H^1\) 和 \(\eta \in \mathbb{R}\) 是任意扰动方向. 在鞍点处, \(\tilde J\) 沿任意方向的导数为零:
Taking variations
Let \(v \in H^1\) and \(\eta \in \mathbb{R}\) be arbitrary perturbation directions. At the saddle point, the derivative of \(\tilde J\) along any direction vanishes:
整理即得如下变分问题. 在第一个方程中取 \(v \equiv 1\) 还可以看出 \(\mu = \big( \int_\Omega f + \int_{\partial\Omega} g_N \big) / |\Omega|\): 乘子度量数据的不相容程度, 数据满足兼容性条件时 \(\mu = 0\).
Rearranging gives the following variational problem. Taking \(v \equiv 1\) in the first equation also shows \(\mu = \big( \int_\Omega f + \int_{\partial\Omega} g_N \big) / |\Omega|\): the multiplier measures the incompatibility of the data, and \(\mu = 0\) when the compatibility condition holds.
变分问题
求 \(u\in H^1, \mu \in \mathbb{R}\) 使得
Variational problem
Find \(u\in H^1\) and \(\mu \in \mathbb{R}\) such that
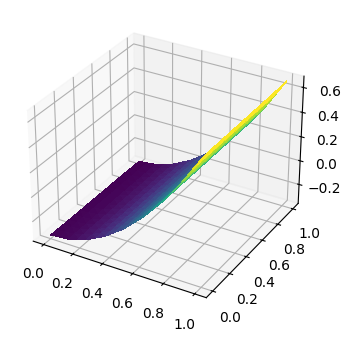
乘子 \(\mu\) 是一个全局常数, 用 R 空间表示 (整个网格上只有一个自由度, 函数空间创建一节的速查表中已提到), 与 \(V\) 组成混合空间. 约束方程保证解自动满足零均值条件, 不需要再做减均值的后处理. 由于鞍点结构, 离散后的线性方程组对称不定; 下面输出中的警告 firedrake:WARNING Real block detected, generating Schur complement elimination PC 表示 Firedrake 检测到 R 分量块, 自动用 Schur 补消元求解这类方程组. 下面的代码求解与上一小节相同的算例, 画出解并输出与真解的 \(L^2\) 误差.
The multiplier \(\mu\) is a single global constant, represented by the R space (one degree of freedom on the whole mesh, listed in the element table of the section on function spaces). It forms a mixed space with \(V\). The constraint equation guarantees that the solution has zero mean, so no post-processing is needed. Owing to the saddle-point structure, the discrete linear system is symmetric indefinite; the warning firedrake:WARNING Real block detected, generating Schur complement elimination PC in the output below indicates that Firedrake detects the R block and solves such systems by Schur-complement elimination. The following code solves the same problem as in the previous subsection, plots the solution, and prints its \(L^2\) error against the exact solution.
from firedrake import *
import matplotlib.pyplot as plt

N = 8
test_mesh = RectangleMesh(nx=N, ny=N, Lx=1, Ly=1)
x, y = SpatialCoordinate(test_mesh)

u_exact = x**2 - 1/3
f = Constant(-2)
g = Constant(2)

V = FunctionSpace(test_mesh, 'CG', degree=1)
R = FunctionSpace(test_mesh, 'R', 0)
W = V * R

u, mu = TrialFunctions(W)
v, eta = TestFunctions(W)

a = inner(grad(u), grad(v))*dx + inner(mu, v)*dx + inner(u, eta)*dx
L = inner(f, v)*dx + inner(g, v)*ds(2)

w_h = Function(W)
solve(a == L, w_h, options_prefix='lagrange')

u_h, mu_h = w_h.subfunctions
print('L2 error (Lagrange multiplier):', errornorm(u_exact, u_h))

fig, ax = plt.subplots(figsize=[4, 4], subplot_kw=dict(projection='3d'))
ts = trisurf(u_h, axes=ax)
L2 error (Lagrange multiplier): 0.0015942860201804015
firedrake:WARNING Real block detected, generating Schur complement elimination PC
终端演示
配套脚本 py/possion_neumann_lagrange.py 与上面的代码基本相同, 只是改为把解保存为 pvd 文件, 并设置了 options_prefix='test'. 下面在终端中运行该脚本, 网格分辨率由参数 -N 指定; 脚本也可以直接用 mpiexec 并行运行.
Terminal demo
The companion script py/possion_neumann_lagrange.py is essentially the same as the code above, except that it saves the solution to a pvd file and sets options_prefix='test'. Run it in a terminal with the mesh resolution given by -N; the script can also be run in parallel with mpiexec.
$ python3 possion_neumann_lagrange.py -test_ksp_monitor -test_ksp_converged_reason -N 64
Number of Dofs: 4226
firedrake:WARNING Real block detected, generating Schur complement elimination PC
    Residual norms for test_ solve.
    0 KSP Residual norm 2.490063364311e-01
    1 KSP Residual norm 9.387807654379e-04
    2 KSP Residual norm 2.230178538057e-16
    Linear test_ solve converged due to CONVERGED_RTOL iterations 2
L2 error: 2.5258963898220323e-05
Write pvd file: pvd/u_h_neumann.pvd

$ mpiexec -n 2 python3 possion_neumann_lagrange.py \
    -test_ksp_monitor -test_ksp_converged_reason -N 64
Number of Dofs: 4226
firedrake:WARNING Real block detected, generating Schur complement elimination PC
    Residual norms for test_ solve.
    0 KSP Residual norm 2.490063364311e-01
    1 KSP Residual norm 6.658879211006e-04
    2 KSP Residual norm 3.688098315189e-16
    Linear test_ solve converged due to CONVERGED_RTOL iterations 2
L2 error: 2.525896389821227e-05
Write pvd file: pvd/u_h_neumann.pvd
1.8. 计算收敛阶 Computing convergence rates#
收敛阶不仅用于排查程序错误, 也是验证数值格式及其收敛性理论的基本手段: 在一列逐级加密的网格上求解, 实测的误差下降阶数应当与理论一致 (如 P1 元的 \(L^2\) 误差为 \(O(h^2)\)). 根据比较基准的不同, 有三种做法: 有真解时直接与真解对比; 没有真解时与更细网格上的参考解对比; 或者相邻层之间两两对比 (即验证解序列是 Cauchy 序列). 本节依次演示这三种做法, 脚本 py/possion_convergence.py 给出了相邻层对比的完整实现.
Convergence rates are not only a way to catch programming errors, but also a basic means of validating the numerical scheme and its convergence theory: solving on a sequence of successively refined meshes, the measured rate of error decay should match the theory (e.g. \(O(h^2)\) for the \(L^2\) error of P1 elements). Depending on the reference used, there are three approaches: compare with the exact solution when it is known; compare with a reference solution on a finer mesh otherwise; or compare consecutive levels pairwise (verifying that the solutions form a Cauchy sequence). This section demonstrates all three; the companion script py/possion_convergence.py implements the pairwise comparison in full.
1.8.1. 生成网格序列 Generating a mesh hierarchy#
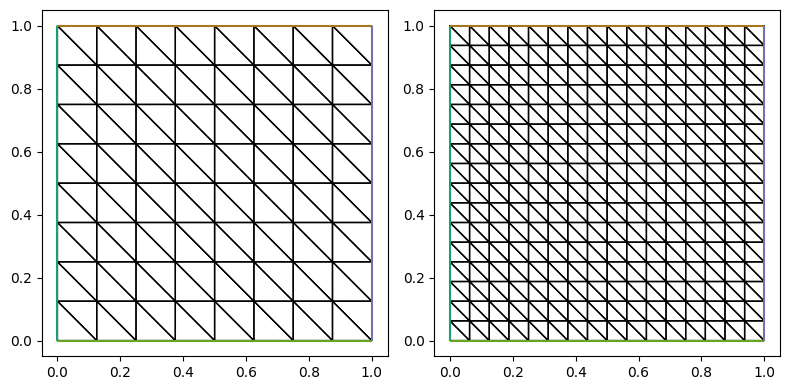
MeshHierarchy(base, refinement_levels=n) 把粗网格 base 逐级加密, 返回由 n+1 层网格组成的序列, 其中 meshes[0] 就是最粗的 base. 这样生成的网格序列是嵌套网格序列, 即相邻层的网格上的有限元空间具有包含关系. 下面以二维区域为例, 生成三角形网格序列并画出前两层网格.
区域复杂时, 一般使用 Gmsh 生成一列尺寸逐渐减小的非结构网格 (如 \(h,\ h/2,\ h/4,\ \dots\)). 这时, 这些网格通常没有嵌套关系. 有真解时, 各层的误差直接在本层网格上计算, 与网格之间的关系无关; 没有真解时, 计算误差和收敛阶需要把不同网格上的解放在一起比较, 这时需要跨网格搬运解, 见后面的跨网格投影与插值小节.
MeshHierarchy(base, refinement_levels=n) refines the coarse mesh base level by level, returning a sequence of n+1 meshes, with meshes[0] being the coarse mesh base. The resulting sequence is nested: the finite element space on each level is contained in that of the next finer level. The following code builds a sequence of triangular meshes on a 2D domain and plots the first two levels.
For complicated domains one usually generates a family of unstructured meshes with decreasing mesh sizes (\(h,\ h/2,\ h/4,\ \dots\)) in Gmsh; such meshes are in general not nested. When the exact solution is known, the error on each level is computed on that mesh alone, independently of how the meshes are related; without an exact solution, computing errors and convergence rates requires putting solutions from different meshes together, and the solutions must then be moved across meshes — see the subsection on cross-mesh projection and interpolation.
from firedrake import *
from py.intro_utils import triplot
import matplotlib.pyplot as plt

N = 8
base = RectangleMesh(N, N, 1, 1)
meshes = MeshHierarchy(base, refinement_levels=3)

n = len(meshes)
m = min(2, n)
fig, ax = plt.subplots(1, m, figsize=[4*m, 4])
for i in range(m):
    triplot(meshes[i], axes=ax[i])
fig.tight_layout()
1.8.2. 与真解对比 Comparing with the exact solution#
在每层网格上求解简单完整示例中的 Poisson 问题, 其中
\(f = 2\pi^2\sin(\pi x)\sin(\pi y)\), 真解 \(u = \sin(\pi x)\sin(\pi y)\),
计算数值解与真解的 \(L^2\) 误差, 并把各层数值解保存到列表 u_hs 中 (供后面小节使用):
On every level of the hierarchy we solve the Poisson problem of the first
example, with \(f = 2\pi^2\sin(\pi x)\sin(\pi y)\) and exact solution
\(u = \sin(\pi x)\sin(\pi y)\), compute the \(L^2\) error of the numerical
solution, and store the solution of each level in the list u_hs (for use
in later subsections):
from py.intro_utils import plot_errors

u_hs = []
errors_exact = []
hs = []
for i, mesh in enumerate(meshes):
    x, y = SpatialCoordinate(mesh)
    f = 2*pi**2*sin(pi*x)*sin(pi*y)
    u_exact = sin(pi*x)*sin(pi*y)

    V = FunctionSpace(mesh, 'CG', degree=1)
    u, v = TrialFunction(V), TestFunction(V)
    bc = DirichletBC(V, 0, sub_domain='on_boundary')

    u_h = Function(V)
    solve(inner(grad(u), grad(v))*dx == inner(f, v)*dx, u_h, bcs=bc)
    u_hs.append(u_h)

    errors_exact.append(float(errornorm(u_exact, u_h)))
    hs.append(1/(N*2**i))

plot_errors(hs, errors_exact, expect_order=2)
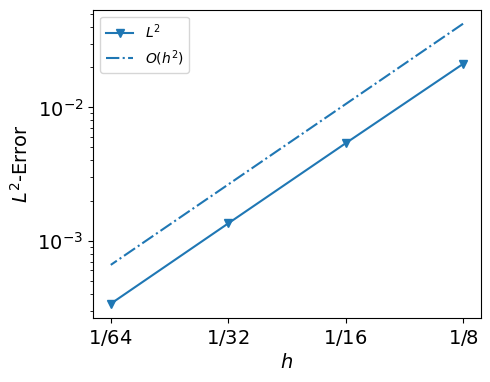
误差曲线的斜率约为 2, 即 P1 元的 \(L^2\) 误差按 \(O(h^2)\) 收敛, 与理论一致.The slope of the error curve is about 2: the \(L^2\) error of P1 elements converges at the expected rate \(O(h^2)\).
1.8.3. 跨网格的投影与插值 Cross-mesh projection and interpolation#
不同网格上的函数不能直接相减, 比较之前要先把它们搬到同一个函数空间中. Firedrake 提供两个工具:
project: \(L^2\) 投影. 对属于同一个MeshHierarchy的网格, 投影使用多重网格的转移算子, 目前只支持相邻层, 想跨多层需要逐层投影传递; 对不属于同一序列的两张网格,project使用 supermesh 投影[11], 没有相邻层的限制.interpolate: 跨网格插值. 对网格没有限制, 两个空间的单元次数也可以不同.
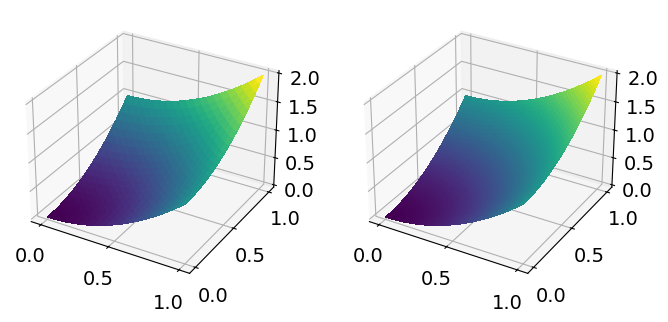
下面演示跨网格插值: 把 10×10 网格上的 P2 函数插值到 20×20 网格的 P3 空间.
Functions living on different meshes cannot be subtracted directly; they must first be moved into a common function space. Firedrake provides two tools:
project: the \(L^2\) projection. For meshes belonging to the sameMeshHierarchy, it uses the multigrid transfer operators, which currently only support adjacent levels — spanning several levels requires projecting level by level. For two meshes not in the same hierarchy,projectuses supermesh projection[11] and has no such restriction.interpolate: cross-mesh interpolation. There is no restriction on the meshes, and the two spaces may use elements of different degrees.
The following demonstrates cross-mesh interpolation: a P2 function on a 10×10 mesh is interpolated into the P3 space on a 20×20 mesh.
from firedrake import *
import matplotlib.pyplot as plt

m1 = RectangleMesh(10, 10, 1, 1)
V1 = FunctionSpace(m1, 'CG', 2)
x, y = SpatialCoordinate(m1)
f1 = Function(V1).interpolate(x**2 + y**2)

m2 = RectangleMesh(20, 20, 1, 1)
V2 = FunctionSpace(m2, 'CG', 3)
f2 = Function(V2).interpolate(f1)

fig, ax = plt.subplots(1, 2, figsize=[8, 4], subplot_kw=dict(projection='3d'))
ts1 = trisurf(f1, axes=ax[0])
ts2 = trisurf(f2, axes=ax[1])
1.8.4. 没有真解时的对比 Comparison without an exact solution#
实际问题往往没有真解. 此时可以把最细网格上的数值解当作参考解; 也可以直接比较相邻两层的解 —— 若格式收敛, 解序列是 Cauchy 序列, 相邻层之差应按同样的阶数下降. 两种对比中, project 和 interpolate 都可以用来搬运解; 为了不让搬运本身污染误差, 接收解的空间一般取得比原空间高两阶 (如 P1 解用 P3 空间接收). 下面用前面保存的各层数值解 u_hs 演示这两种对比: 与最细层对比用 interpolate, 相邻层对比用 project, 两种工具各演示一次.
Real problems usually have no exact solution. One can then take the numerical solution on the finest mesh as a reference solution, or compare the solutions on adjacent levels directly — if the scheme converges, the solutions form a Cauchy sequence and the difference between adjacent levels decays at the same rate. Either project or interpolate can be used to move the solutions in both comparisons; to keep the transfer itself from polluting the error, the receiving space is usually chosen two degrees higher than the original one (e.g. P3 for a P1 solution). Below, both comparisons use the solutions u_hs stored earlier, with interpolate for the comparison against the finest level and project for the pairwise one, demonstrating each tool once.
from py.intro_utils import plot_errors

# Compare with the reference solution on the finest level:
# interpolate into the CG3 space on the finest mesh
V_ref = FunctionSpace(meshes[-1], 'CG', 3)
u_ref = Function(V_ref).interpolate(u_hs[-1])

errors_ref = []
for u_h in u_hs[:-1]:
    u_intp = Function(V_ref).interpolate(u_h)
    errors_ref.append(float(errornorm(u_intp, u_ref)))

# Compare adjacent levels (Cauchy sequence):
# project into the CG3 space on the next finer level
errors_cauchy = []
for i, u_h in enumerate(u_hs[:-1]):
    V_next = FunctionSpace(meshes[i+1], 'CG', 3)
    u_proj = project(u_h, V_next)
    u_next = Function(V_next).interpolate(u_hs[i+1])
    errors_cauchy.append(float(errornorm(u_proj, u_next)))

fig, ax = plt.subplots(1, 2, figsize=[10, 4])
plot_errors(hs[:-1], errors_ref, expect_order=2, axes=ax[0])
plot_errors(hs[:-1], errors_cauchy, expect_order=2, axes=ax[1])
ax[0].set_title('vs reference solution')
ax[1].set_title('adjacent levels')
fig.tight_layout()
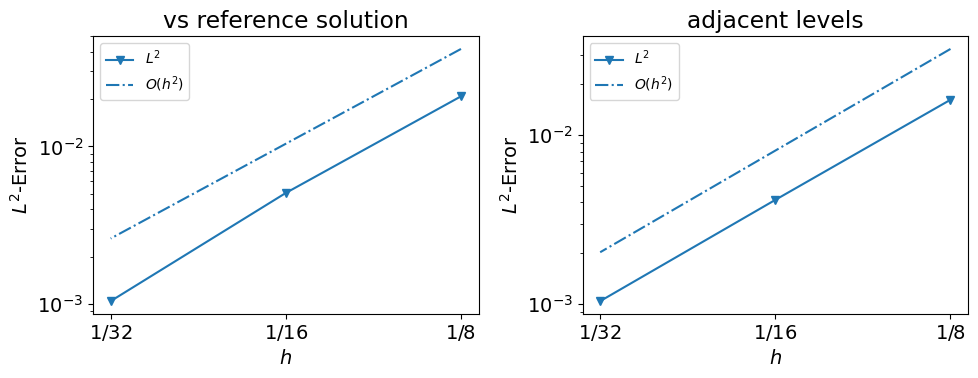
三种对比方式得到的收敛阶一致 (斜率约为 2). 配套脚本 py/possion_convergence.py 把相邻层对比封装成了完整的可运行脚本, 网格分辨率、加密层数和单元次数都可以通过命令行参数调整.
All three comparisons give the same convergence rate (slope about 2). The companion script py/possion_convergence.py packages the pairwise comparison into a complete runnable script, with the mesh resolution, number of refinement levels and element degree adjustable from the command line.
1.9. 数值积分公式 Quadrature rules#
有限元组装矩阵时, 积分通过参考单元上的数值积分公式计算. 积分公式的次数是它能够精确积分的最高多项式次数, 应由被积表达式而不只是有限元次数决定. TSFC[12] 会自动估计所需次数, 一般不需要干预; 显式指定次数主要用于研究欠积分、控制计算代价或使用自定义公式. 下面依次介绍如何查看、指定和自定义积分公式, 并用一个四次多项式展示次数过低造成的积分误差. 官方文档的 Quadrature rules 页面对 scheme 与 degree 参数有简要介绍.
When a finite element matrix is assembled, each cell integral is evaluated by a quadrature rule on the reference cell. The degree of a rule is the highest polynomial degree it integrates exactly, so it is determined by the integrand rather than by the finite element degree alone. TSFC[12] estimates the required degree automatically, so intervention is rarely necessary; an explicit degree is mainly useful for studying underintegration, controlling cost, or supplying a custom rule. Below we inspect, select, and customize quadrature rules, using a degree-4 polynomial to demonstrate the error caused by a rule of insufficient degree. The Quadrature rules page of the official Firedrake documentation gives a brief account of the scheme and degree arguments.
1.9.1. 查看数值积分公式 Inspecting the quadrature rule#
积分公式定义在参考单元上. FIAT[13] 提供参考单元, 如 UFCTriangle (顶点为 \((0,0)\), \((1,0)\), \((0,1)\)); finat.quadrature.make_quadrature(cell, degree) 返回能精确积分 degree 次多项式的积分公式, 它由积分点 points 和权重 weights 组成, 权重之和等于参考三角形的面积 \(1/2\). 下面列出 0 到 3 次的积分公式: 0 次和 1 次都只用形心一个点, 2 次用 3 个点, 3 次用 6 个点.
Quadrature rules are defined on the reference cell. FIAT[13] provides the reference cells, e.g. UFCTriangle with vertices \((0,0)\), \((1,0)\), \((0,1)\); finat.quadrature.make_quadrature(cell, degree) returns a rule that integrates polynomials of degree degree exactly, consisting of the quadrature points points and the weights weights, which sum to the area \(1/2\) of the reference triangle. The rules of degree 0 to 3 are listed below: degrees 0 and 1 use the single centroid point, degree 2 uses 3 points, and degree 3 uses 6 points.
import FIAT
import finat
from pprint import pprint

ref_cell = FIAT.reference_element.UFCTriangle()

ret = {}
for i in range(0, 4):
    qrule = finat.quadrature.make_quadrature(ref_cell, i)
    ret[i] = {'points': qrule.point_set.points, 'weights': qrule.weights}

pprint(ret)
{0: {'points': array([[0.33333333, 0.33333333]]), 'weights': array([0.5])},
 1: {'points': array([[0.33333333, 0.33333333]]), 'weights': array([0.5])},
 2: {'points': array([[0.16666667, 0.16666667],
       [0.16666667, 0.66666667],
       [0.66666667, 0.16666667]]),
     'weights': array([0.16666667, 0.16666667, 0.16666667])},
 3: {'points': array([[0.65902762, 0.23193337],
       [0.65902762, 0.10903901],
       [0.23193337, 0.65902762],
       [0.23193337, 0.10903901],
       [0.10903901, 0.65902762],
       [0.10903901, 0.23193337]]),
     'weights': array([0.08333333, 0.08333333, 0.08333333, 0.08333333, 0.08333333,
       0.08333333])}}
1.9.2. 显式选择积分公式 Choosing the quadrature degree explicitly#
测度接受 scheme 参数, 如 dx(scheme=qrule) 表示用指定的积分公式计算该积分; 若只想指定次数, 可以直接写 dx(degree=4), 不必构造公式. 下面的被积函数 \(f = x^3 + y^4 + x^2 y^2\) 是 4 次多项式, 精确积分为 \(1/4 + 1/5 + 1/9 = 0.56111\dots\): 次数不低于 4 的公式给出精确值, 低次公式有明显误差; 不作指定时 TSFC 自动估计次数, 结果同样精确.
Measures accept a scheme argument: dx(scheme=qrule) evaluates the integral with the given rule; to prescribe only the degree, write dx(degree=4) directly without constructing a rule. The integrand below, \(f = x^3 + y^4 + x^2 y^2\), is a polynomial of degree 4 with exact integral \(1/4 + 1/5 + 1/9 = 0.56111\dots\): rules of degree at least 4 reproduce it exactly, lower-degree rules show a clear error, and without any specification TSFC estimates the degree automatically and is exact as well.
from firedrake import *
import finat

mesh = RectangleMesh(nx=8, ny=8, Lx=1, Ly=1)
V = FunctionSpace(mesh, 'CG', 1)
cell = V.finat_element.cell

x, y = SpatialCoordinate(mesh)
f = x**3 + y**4 + x**2*y**2

ret = {}
for i in range(0, 5):
    qrule = finat.quadrature.make_quadrature(cell, i)
    qrule.ufl_signature = repr(qrule)
    ret[i] = {'points': qrule.point_set.points, 'weights': qrule.weights}
    v = assemble(f*dx(scheme=qrule))
    print(f'degree={i}, v = {v}', )

print('Degree 4: v =', assemble(f*dx(degree=4)))
print('Default:  v =', assemble(f*dx(scheme=None)))
degree=0, v = 0.5579329125675153
degree=1, v = 0.5579329125675153
degree=2, v = 0.5611099431544172
degree=3, v = 0.5611100938585067
degree=4, v = 0.5611111111111101
Degree 4: v = 0.5611111111111101
Default:  v = 0.5611111111111101
为什么要使用 ufl_signature? (点击展开)
通常使用 dx 或 dx(degree=4) 时, UFL 元数据中只包含默认设置或整数积分次数; TSFC 随后在编译阶段生成积分公式, 因此 QuadratureRule 对象不会参与 UFL 表单签名. dx(scheme=qrule) 则会把 qrule 对象直接存入积分元数据. UFL 在生成表单缓存键时, 需要将这些元数据转换为稳定、可比较的表示. 由于 FInAT 的 QuadratureRule 默认没有 ufl_signature, UFL 只能退回到 str(qrule), 并发出 Applying str() ... don't know if this is safe 警告: UFL 无法确认这个字符串能否稳定且唯一地表示积分点和权重.
在积分点和权重确定后设置 qrule.ufl_signature = repr(qrule), 就是明确指定用包含这些数据的表示作为缓存签名. 如果之后修改了积分规则, 也应重新设置该签名.
Why use ufl_signature? (click to expand)
With dx or dx(degree=4), UFL metadata contains only the default setting or an integer quadrature degree; TSFC creates the rule later during compilation, so no QuadratureRule object participates in the UFL form signature. In contrast, dx(scheme=qrule) stores qrule directly in the integral metadata. To build a form-cache key, UFL must convert this metadata to a stable, comparable representation. Because FInAT’s QuadratureRule has no ufl_signature by default, UFL falls back to str(qrule) and emits the Applying str() ... don't know if this is safe warning: UFL cannot tell whether that string stably and uniquely represents the quadrature points and weights.
Setting qrule.ufl_signature = repr(qrule) after the points and weights are finalized explicitly uses their representation as the cache signature. If the rule is modified later, the signature should be updated as well.
1.9.3. 自定义数值积分 Custom quadrature rules#
积分公式本质上是一组积分点和权重, 可以自定义: 用 PointSet 给出积分点, 与权重一起构造 QuadratureRule. 下面以三角形的三个顶点为积分点、权重各取 \(1/6\) (权重之和为参考三角形面积 \(1/2\)) 构造积分公式, 该公式对线性函数精确. 这类顶点积分公式常用于质量集中 (mass lumping) 有限元. 最后验证它与默认公式对线性函数 \(x\) 给出相同的积分值.
A quadrature rule is nothing but a set of points and weights, so it can be customized: build a PointSet from the desired points and combine it with the weights into a QuadratureRule. Below, the three vertices of the triangle serve as quadrature points with weight \(1/6\) each (the weights sum to the reference-triangle area \(1/2\)), which is exact for linear functions. Vertex-based rules of this kind are commonly used for mass-lumped finite elements. Finally we verify that it agrees with the default rule on the linear function \(x\).
from firedrake import *
import FIAT
import finat

ref_cell = FIAT.reference_element.UFCTriangle()
print('vertices:', ref_cell.vertices)

point_set = finat.quadrature.PointSet(ref_cell.vertices)
weights = [1/6, 1/6, 1/6]

qrule = finat.quadrature.QuadratureRule(point_set, weights)
qrule.ufl_signature = repr(qrule)

print("points: ", qrule.point_set.points)
print("weights: ", qrule.weights)

mesh = RectangleMesh(nx=8, ny=8, Lx=1, Ly=1)
x = SpatialCoordinate(mesh)
print("integral of x[0] on domain by default scheme: ", assemble(x[0]*dx))
print("integral of x[0] on domain by new defined-scheme: ", assemble(x[0]*dx(scheme=qrule)))
vertices: ((0.0, 0.0), (1.0, 0.0), (0.0, 1.0))
points:  [[0. 0.]
 [1. 0.]
 [0. 1.]]
weights:  [0.16666667 0.16666667 0.16666667]
integral of x[0] on domain by default scheme:  0.49999999999999994
integral of x[0] on domain by new defined-scheme:  0.5
1.10. 网格尺寸和质量 Mesh size and quality#
1.10.1. 网格尺寸 Mesh size#
书写依赖网格尺寸 \(h\) 的表达式 (如稳定化参数、误差指示子) 时, 需要取得单元尺寸. UFL 符号 CellDiameter 表示单元内任意两点间的最大距离 (对三角形即最长边), Circumradius 表示外接圆半径; Firedrake 的 CellSize 就是 CellDiameter 的别名. UFL 没有表示内切圆半径的现成符号, 下一小节计算质量指标时用自定义内核求出它. 这些符号可以直接写进变分形式, 也可以像下面这样插值到 DG0 空间逐单元查看. 此外, mesh.cell_sizes 给出 CellSize 向连续 P1 空间作 \(L^2\) 投影得到的函数, 自由度在顶点上.
下面的网格是剖成两个直角三角形的单位正方形: 最长边即对角线 \(\sqrt 2\), 外接圆半径为斜边之半 \(\sqrt 2/2\).
Expressions involving the mesh size \(h\) (stabilization parameters, error indicators, and the like) need access to the size of each cell. The UFL symbol CellDiameter is the largest distance between any two points of a cell (the longest edge for triangles), and Circumradius is the circumradius; Firedrake’s CellSize is simply an alias of CellDiameter. UFL has no built-in symbol for the inradius; the next subsection computes it with a custom kernel when evaluating mesh quality. These symbols can be used directly in variational forms, or interpolated into a DG0 space to inspect cell by cell, as below. In addition, mesh.cell_sizes is the \(L^2\) projection of CellSize onto the continuous P1 space, with degrees of freedom at the vertices.
The mesh below is the unit square split into two right triangles: the longest edge is the diagonal \(\sqrt 2\), and the circumradius is half the hypotenuse, \(\sqrt 2/2\).
Warning
Circumradius 只能用于线性网格
Warning
Circumradius only works on linear (non-curved) meshes.
from firedrake import *

mesh = RectangleMesh(1, 1, 1, 1)
V = FunctionSpace(mesh, 'DG', 0)

d_int = Function(V).interpolate(CellDiameter(mesh))
r_int = Function(V).interpolate(Circumradius(mesh))
size = mesh.cell_sizes

print('CellDiameter:', d_int.dat.data)
print('cell_sizes  :', size.dat.data)
print('Circumradius:', r_int.dat.data)
CellDiameter: [1.41421356 1.41421356]
cell_sizes  : [1.41421356 1.41421356 1.41421356 1.41421356]
Circumradius: [0.70710678 0.70710678]
1.10.2. 网格质量 Mesh quality#
质量太差 (过于扁平) 的单元会恶化插值误差和刚度矩阵的条件数, 生成或变形网格后常需要检查单元质量. 下面用自定义内核在每个单元上计算质量指标 (par_loop 和 op2.par_loop 的使用见 par_loop 与 op2.par_loop par_loop and op2.par_loop, 初次阅读把内核当黑盒即可). 质量指标取归一化的内切圆 (球) 半径与外接圆 (球) 半径之比[14]
如此正三角形和正四面体的质量恰为 \(1\), 单元越退化 \(q\) 越小. 以下内核仅适用于线性网格.
Poorly shaped (overly flat) cells degrade the interpolation error and the conditioning of the stiffness matrix, so checking cell quality is common after generating or deforming a mesh. Below we compute a per-cell quality measure with custom kernels (see par_loop 与 op2.par_loop par_loop and op2.par_loop for the usage of par_loop and op2.par_loop; treat the kernels as black boxes on first reading). The measure is the normalized ratio of the inradius to the circumradius[14],
which equals exactly \(1\) for an equilateral triangle and for a regular tetrahedron, and decreases as the cell degenerates. The kernels below only work on linear meshes.
from firedrake import *

def get_quality_3d(mesh):
    kernel = r'''
    void get_quality(double coords[4][3], double v[1], double q[1]){
        double a, b, c, p;
        double ls[6];
        double s, r, R, _tmp;
        double v1[3], v2[3], v3[3];
        int idx[6][2] = {{0, 1}, {2, 3}, {0, 2}, {1, 3}, {0, 3}, {1, 2}};
        int idx2[4][3] = {{0, 1, 2}, {0, 2, 3}, {1, 2, 3}, {0, 1, 3}};
        for (int i=0; i < 6; i++){
            _tmp = 0;
            for (int j=0; j < 3; j++){
                _tmp += pow(coords[idx[i][0]][j] - coords[idx[i][1]][j], 2.0);
            }
            ls[i] = sqrt(_tmp);
        }
        a = ls[0]*ls[1];
        b = ls[2]*ls[3];
        c = ls[4]*ls[5];
        p = (a + b + c)/2;

        s = 0;
        for (int i=0; i < 4; i++){
            for (int j = 0; j < 3; j++){
                v1[j] = coords[idx2[i][2]][j] - coords[idx2[i][0]][j];
                v2[j] = coords[idx2[i][2]][j] - coords[idx2[i][1]][j];
            }
            v3[0] =   v2[1]*v1[2] - v2[2]*v1[1];
            v3[1] = - v2[0]*v1[2] + v2[2]*v1[0];
            v3[2] =   v2[0]*v1[1] - v2[1]*v1[0];
            s += sqrt(pow(v3[0], 2.0) + pow(v3[1], 2.0) + pow(v3[2], 2.0))/2;
        }

        R = sqrt(p*(p-a)*(p-b)*(p-c))/v[0]/6.0;
        r = 3*v[0]/s;
        q[0] = 3*r/R;
    }
    '''

    coords =  mesh.coordinates
    V = FunctionSpace(mesh, 'DG', 0)
    volume = Function(V).interpolate(CellVolume(mesh))
    quality = Function(V)

    cell_node_map = quality.cell_node_map()
    op2.par_loop(op2.Kernel(kernel, 'get_quality'), cell_node_map.iterset,
                 coords.dat(op2.READ, coords.cell_node_map()),
                 volume.dat(op2.READ, cell_node_map),
                 quality.dat(op2.WRITE, cell_node_map))

    return quality

def get_quality_2d(mesh):
    V = FunctionSpace(mesh, 'DG', 0)
    quality = Function(V)
    domain = '{[i]: 0 <= i < A.dofs}'
    # 0, 1
    # 2, 3
    # 4, 5
    # B[2] - B[0], B[3] - B[1]
    # B[4] - B[0], B[5] - B[1]
    instructions = '''
for i
    <> S = fabs((B[2, 1] - B[0, 1])*(B[1, 0] - B[0, 0]) - (B[1, 1] - B[0, 1])*(B[2, 0] - B[0, 0]))
    <> a = sqrt(pow(B[1, 0] - B[0, 0], 2.) + pow(B[1, 1] - B[0, 1], 2.))
    <> b = sqrt(pow(B[2, 0] - B[1, 0], 2.) + pow(B[2, 1] - B[1, 1], 2.))
    <> c = sqrt(pow(B[0, 0] - B[2, 0], 2.) + pow(B[0, 1] - B[2, 1], 2.))
    <> R = a*b*c/(2*S)
    <> r = S/(a+b+c)
    A[0] = 2*r/R
end
'''

    par_loop((domain, instructions), \
             dx, \
             {'A': (quality, WRITE), 'B' :(mesh.coordinates, READ)})

    return quality

def get_quality_2d_surface(mesh):
    kernel = r'''
    void get_quality(double coords[3][3], double v[1], double q[1]){
        double p, _tmp, R, r, ls[3];
        double S = v[0];
        int idx[3][2] = {{0, 1}, {1, 2}, {0, 2}};
        for (int i=0; i < 3; i++){
            _tmp = 0;
            for (int j=0; j < 3; j++){
                _tmp += pow(coords[idx[i][0]][j] - coords[idx[i][1]][j], 2.0);
            }
            ls[i] = sqrt(_tmp);
        }
        p = (ls[0] + ls[1] + ls[2])/2;

        // S = sqrt(p*(p-ls[0])*(p-ls[1])*(p-ls[2]));
        R = ls[0]*ls[1]*ls[2]/(4*S);
        r = S/p;
        q[0] = 2*r/R;
    }
    '''

    coords =  mesh.coordinates
    V = FunctionSpace(mesh, 'DG', 0)
    volume = Function(V).interpolate(CellVolume(mesh))
    quality = Function(V)

    cell_node_map = quality.cell_node_map()
    op2.par_loop(op2.Kernel(kernel, 'get_quality'), cell_node_map.iterset,
                 coords.dat(op2.READ, coords.cell_node_map()),
                 volume.dat(op2.READ, cell_node_map),
                 quality.dat(op2.WRITE, cell_node_map))
    return quality
二维和三维
单位正方形剖出的直角三角形 \(q = 2(\sqrt 2 - 1) \approx 0.83\), 单位立方体剖出的四面体 \(q \approx 0.72\), 都小于正单元的 \(1\):
2D and 3D
The right triangles obtained by splitting the unit square have \(q = 2(\sqrt 2 - 1) \approx 0.83\), and the tetrahedra obtained by splitting the unit cube have \(q \approx 0.72\) — both below the value \(1\) of the regular cells:
mesh2d = RectangleMesh(1, 1, 1, 1)
mesh3d = UnitCubeMesh(1, 1, 1)

q2 = get_quality_2d(mesh2d)
q3 = get_quality_3d(mesh3d)

print('q2 =', q2.dat.data)
print('q3 =', q3.dat.data)
q2 = [0.82842712 0.82842712]
q3 = [0.71743894 0.71743894 0.71743894 0.71743894 0.71743894 0.71743894]
二维正三角形
用 DMPlex 手工构造一个正三角形单元, 质量指标应恰为 \(1\):
2D equilateral triangle
Construct a single equilateral triangle by hand via DMPlex; its quality measure should be exactly \(1\):
from firedrake.petsc import PETSc
from pyop2.datatypes import IntType
import numpy as np

cells = np.array([[0, 1, 2]], dtype=IntType)
coords = np.array([[0.0, 0.0],
                   [1.0, 0.0],
                   [1/2, np.sqrt(3)/2]])

plex = PETSc.DMPlex()
plex.createFromCellList(2, cells, coords)
mesh = Mesh(plex)
q_mesh = get_quality_2d(mesh)
print('q =', q_mesh.dat.data)
assert np.allclose(q_mesh.dat.data, 1)
q = [1.]
曲面区域的网格
球面剖分成正三角形网格后, 用曲面版本的内核计算, 质量均为 \(1\); 第二个代码单元演示单个嵌入三维空间的平面三角形:
Meshes of surface domains
After the sphere is triangulated into equilateral triangles, the surface version of the kernel gives quality \(1\) on every cell; the second code cell shows a single flat triangle embedded in 3D:
mesh_surf = IcosahedralSphereMesh(1)
q_surf = get_quality_2d_surface(mesh_surf)
print('q =', q_surf.dat.data)
assert np.allclose(q_surf.dat.data, 1)
q = [1. 1. 1. 1. 1. 1. 1. 1. 1. 1. 1. 1. 1. 1. 1. 1. 1. 1. 1. 1.]
from firedrake.petsc import PETSc
from pyop2.datatypes import IntType

cells = np.array([[0, 1, 2]], dtype=IntType)
coords = np.array([[0.0, 0.0, 0.0],
                   [1.0, 0.0, 0.0],
                   [1/2, np.sqrt(3)/2, 0.0]])

plex = PETSc.DMPlex()
plex.createFromCellList(2, cells, coords)
mesh = Mesh(plex, dim=3)
q_mesh = get_quality_2d_surface(mesh)
print('q =', q_mesh.dat.data)
assert np.allclose(q_mesh.dat.data, 1)
q = [1.]
1.11. 小结与练习 Summary and exercises#
本章完整走了一遍用 Firedrake 求解线性椭圆问题的流程: 网格 → 函数空间 → 变分形式 (UFL) → 求解器参数 → 边界条件 (Dirichlet/Neumann) → 收敛阶验证, 并以数值积分公式、网格尺寸和质量两个专题作结.
练习
把简单完整示例中的 P1 元改为 P2 元 (
degree=2), 重新计算收敛阶, 验证 \(L^2\) 误差按 \(O(h^3)\) 收敛.把边界条件改为非齐次 Dirichlet 条件 \(g_D = xy\), 构造相应的 \(f\) 与真解, 验证程序.
在使用 Lagrange 乘子一节的算例中改用不相容数据 (保留 \(f = -2\), 但令 \(g_N = 0\)), 求解后查看乘子的值 (
mu_h.dat.data), 验证它等于 \(\big( \int_\Omega f + \int_{\partial\Omega} g_N \big)/|\Omega|\).用 Gmsh 生成一列尺寸减半的非结构网格, 重复计算收敛阶一节的实验; 与真解对比不需要跨网格操作, 相邻网格对比时可用 supermesh 投影.
用自定义数值积分一节的顶点积分公式组装 P1 质量矩阵 \(\int_\Omega u v \, {\rm d}x\), 验证得到的矩阵是对角的 (质量集中).
This chapter walked through the whole workflow of solving a linear elliptic problem with Firedrake: mesh → function space → variational form (UFL) → solver options → boundary conditions (Dirichlet/Neumann) → convergence verification, closing with two special topics: quadrature rules, and mesh size and quality.
Exercises
Replace the P1 element in the first example by P2 (
degree=2), redo the convergence study and verify that the \(L^2\) error converges as \(O(h^3)\).Change the boundary condition to the inhomogeneous Dirichlet condition \(g_D = xy\), construct a matching \(f\) and exact solution, and verify your code.
In the example of the Lagrange multiplier section, switch to incompatible data (keep \(f = -2\) but set \(g_N = 0\)), solve, inspect the multiplier value (
mu_h.dat.data), and verify that it equals \(\big( \int_\Omega f + \int_{\partial\Omega} g_N \big)/|\Omega|\).Generate a family of unstructured meshes with halving mesh sizes in Gmsh and repeat the experiments of the convergence-rate section; comparing with the exact solution needs no cross-mesh operations, while adjacent meshes can be compared via supermesh projection.
Assemble the P1 mass matrix \(\int_\Omega u v \, {\rm d}x\) with the vertex quadrature rule of the custom-quadrature section and verify that the resulting matrix is diagonal (mass lumping).